Emile Henry loaf baker - need help

Hello bread fans!

I bought an Emile Henry ceramic loaf baker (with lid). It came with two non-standard bread recipes - sweet whole wheat (why do people think whole wheat anything must be sweet???) and gluten free. Not very helpful. I have tried some of my own recipes and also one I got from the thousands on the EH website. I cannot detect any difference between the bread that I make in this very expensive pan and my dollar store metal pan.

I know some of you are crying out right now “No, this is the best bread pan ever!” I know lots of people feel that way. What I would like to know is: what is a basic bread recipe that turns out great using this pan? I don’t want it to have 50 ingredients, or weird ingredients. Just a basic recipe, with good instructions for using this specific loaf baker, such as oven temp, cooking time, did you leave the lid on for a while after removing from the oven, etc.

I have tried baking with the lid on and off, and halfway lid change. I am baking at 450F. I tried brushing the loaf with water and not brushing it. Other than the fact that the pan is more annoying to use, I can’t find any difference between this and my cheap pan.

Any help would be appreciated!
Experiment time. Make one big dough and after the bulk ferment split it in two. Shape and final proof then bake one loaf in the Emile Henry Loaf Baker and the other in the cheap pot. Compare.

I always bake two loaves at once. Every loaf that I have baked in the EH had the other half of the dough in the cheap pan. I adjusted the cooking times to match the pans. No difference.

Got a recipe? : - )

Is this the loaf pan you’re referring to?

This should make for a more crispy crust than what you would get using a loaf pan without a lid because it will trap steam and you can bake at a higher heat.

“Best bread ever” is subjective because maybe you prefer softer crust. Ultimately, I think the baking vessel and the recipe are only part of what makes good bread. The skill of the baker to read the dough fermentation and develop the dough is a large part of the formula too.

Yeasted or Sourdough. But I don’t think the recipe will make much difference as the purpose of these baking vessels is more for the crust being a good method when it comes to steaming.

I agree. It should make a more crispy crust. But it has not, in my experience. Mine is similar to the one shown, but shaped like a regular loaf, not italian.

I would love to have a crispier crust, and that’s why I bought the pan. But there is no difference in my bread.

Yeasted, please. I don’t do sourdough.

I’ve been discussing this recipe with a friend of mine so why not give this one a go? You will need bread or AP flour and durum flour or fine semolina.

Tom Cat’s Semolina Filone

Poolish

[Instant yeast Dissolve 1/4 tsp in 1 cup (236g) of 110F water. Use 1/4 cup (59g) of the resulting suspension]

  • Water 135g (59g of the yeast water suspension + 76g water).
  • Flour 150g of King Arthur AP (or 75 gms lower-gluten AP and 75 gms Bread Flour)

Dough

  • Durum/Fine Semolina Flour 250g
  • AP Flour 50g
  • Water 180-205g [if using semolina then 180g if using durum flour then 205g]
  • Instant Yeast 1/4 tsp
  • Poolish: All of the above
  • Salt 9g
  • Sesame seeds: About 2 cups

Procedure

  • The night before baking, mix the poolish and ferment 8 hours, covered tightly.

  • The day of baking, combine the flours and water (you can always start off with the lower amount and add in the difference if needed when forming the final dough), mix and autolyse, covered, for 15-60 minutes. Mix the yeast with the poolish and add to the autolysed dough for 5 minutes. The dough should clean the sides of a stand mixer, according to Glezer. Sprinkle the salt on the dough and mix for another 2 minutes. The dough should be sticky but not “gloppy.”

  • Scrape the dough into a bowl 3 times its volume, cover and ferment for 2-3 hours, folding every 20 minutes for the first hour. Preheat the oven to 400F and prepare your steaming apparatus of choice. Scrape the dough onto your bench and preform it into a boule. Let it rest for 20-30 minutes to relax the dough, then form it into a batard.

  • Roll the loaf in sesame seeds and place it, seam side up, in a linen or parchment couche. If using a parchment couch you will bake on, place the batard seam side down.) Cover it well and allow it to expand until quite puffy. Should take 30-60 minutes.

  • Roll the batard onto parchment (If using a linen couche). Spray with water and score with one cut from end to end. (I cut holding the knife at and angle to get a nice “ear” and “grigne.”)

  • Transfer the batard to the oven and bake with steam for 15 minutes, then continue to bake another 30 minutes or so until the bread is well-cooked. (Golden-brown color, hollow thump on the bottom and internal temperature of 205F.

  • Cool completely before slicing.

What do you think? I’ve made some changes in the hydration if you use fine semolina instead of durum flour because it’s less thirsty. You can always start off lower and add extra water in later if it’s too dry.

Thanks for the recipe! I am very old school. I had to look up definitions for a half dozen of the words. I started making bread in the 70’s, stopped for a while, and took it up again when I retired. I haven’t bought bread in years. I have some questions even after my dictionary searches, if you don’t mind.

I make 1 cup of yeast suspension and put 1/4c in the poolish. What to do with the other ¾ cup suspension?

2c sesame seeds - I assume only a small fraction of this is intended to stick to the bread and the rest is for convenience, right?

mix and autolyse, covered for 15-60 minutes. I assume this means mix, then cover, then let rest for 15-60 minutes.

I don’t own a stand mixer. I mix by hand. Is it essential?

“prepare steaming apparatus of choice”. Does this mean preheat my baker pan in the oven?

“Transfer the batard to the oven and bake with steam for 15 minutes, then continue to bake another 30 minutes or so until the bread is well-cooked.” I assume this means cook with the lid on for 15 minutes, lid off for 30, right?

Thanks for your help!

1: Throw it away. It’s a way of measuring a very small amount of instant yeast. The poolish needs 135g water + 150g flour + 0.19g yeast. Very difficult to measure accurately. So if you dissolve 1/4 tsp of instant yeast into one cup (236g) of water and use 1/4 cup (59g) of that in the poolish, plus 76g water, then you can accurately measure the yeast using volume. If you have scales that can measure such fractions then by all means skip that step.

2: I imagine not all of it will stick to the loaf. Just read… Coat with sesame seeds.

3: Yes, autolyse is a step where the just the flour and water are mixed and left to rest so the flour can absorb the water before the poolish and salt are added.

4: Yes, it can be done by hand in which case definitely start off with the lower hydration keeping the difference to one side. Should you feel the dough needs it, and you can handle it, then add the left over water in later as you are forming and kneading the final dough.

5: If you bake in a Dutch Oven then this step doesn’t apply.

6: If baking in a Dutch Oven then lid on = steam, and lid off = no steam. So that would make sense to me too.

P.s. this makes one loaf.

Thank you! It will take me a while to get the ingredients, but I’ll let you know how it goes! I’ll try doubling the recipe, with one loaf in each pan.

1 Like

Durum flour is also known as Semola Rimacinata. It’s basically Re-milled Semolina much finer into a flour. If you can’t find it then use Fine Semolina. It works but its not as thirsty so watch the hydration.

Here’s a link to this recipe baked by my friend Alan. An idea of what you’re aiming for.

Well, sorry, Abe, but I would not say that I was a success!

First, I made the poolish in the morning, since I wanted to do exactly 8 hours and I didn’t want it to be the last thing of the night and the first thing of the morning. Then I saw that it was several hours work after the poolish! So I put the poolish in the fridge, took it out in the evening, and let it sit overnight at room temperature. Not sure it if mattered.

Mixing the poolish and dough by hand was a very difficult job - I would not recommend it! Like trying to combine slime with playdoh. I was successful, but it was very difficult.

I tried to follow the recipe exactly, only omitting sesame seeds.

When I tried to remove the bread pan lid after 15 minutes, the loaf was stuck to the lid. This seems to be a common problem with this pan. I managed to scrape it off the lid without losing much of the crust. Major disaster!

I think this was too much dough for my standard size loaf pans. Both loaves had pretty small air holes when baked. One loaf was limited by the lid. The open metal pan can only rise so much before it overflows and goes down the side. I don’t think it could have gone much higher.

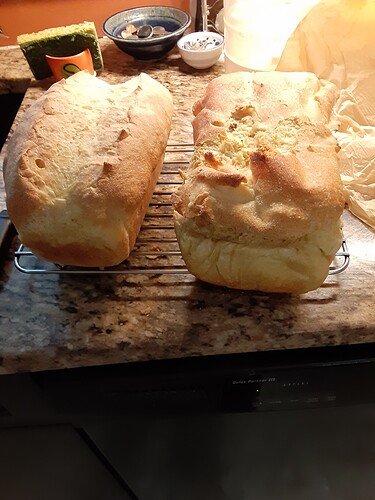
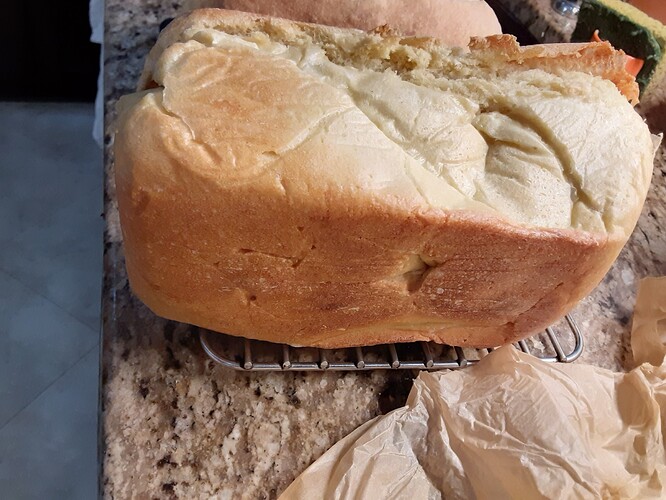
I put the parchment with dough in both pans. This did not work well in the ceramic pan. There was not enough contact with the sides of the pan, and they came out pale and soft. (Picture shows contrast between color of sides and bottom. The metal pan loaf came out even on all sides.)

I would have baked it longer if I had seen the picture, but I didn’t notice it until after baking.

I really appreciate your help, Abe, but I don’t think this was the recipe I was looking for. Have you made it in a ceramic baker with a lid? I’m going to continue searching. There has to be someone out there that makes bread once or more per week using this bread pan. Just a simple, everyday recipe.

I attached pictures of the finished products. The loaf on the left was with a cheap metal pan, and the one on the right (with damaged top) was in my Emile Henry bread loaf baker. Baking time was much longer for the ceramic baker, of course! The picture with the single loaf shows the pale side of the bread.

Edited: I see from your other post that this is the pan you have.

With vents like this, I don’t think you’re going to get an artisan style crispy crust.

I’m sorry I haven’t worked with this baker, but from what I can tell, you could make a plain white sandwich bread in there, like the one @oaklandpat just posted, and it would fit fine – not stick to the top. That lid is for some steam trapping but not meant to have contact with the dough, so you want a smaller dough than what you just baked. Because you’re using ceramic and not the more typical coated aluminum of a loaf pan, your bake time is going to have to be longer. Ceramic holds heat better than aluminum, but it requires more time to get hot. Follow the time and temp of the two sample recipes that came with the baker.

Thanks for the recipe, but I’ll hold out for a recipe tested to work in this pan. I’m almost at the end of my patience with it. I’ll make one more recipe in it and then get rid of it if it isn’t better than my cheap metal pan. So I’m waiting for a recipe that has been proven in this pan. But thanks for your time!