I am usually a stickler for following a recipe first time. However this looked so good and I had enough ingredients that matched up with the recipe that I thought I would go for it. And of course Eric invited us to try our own take on it . So here’s what happened:
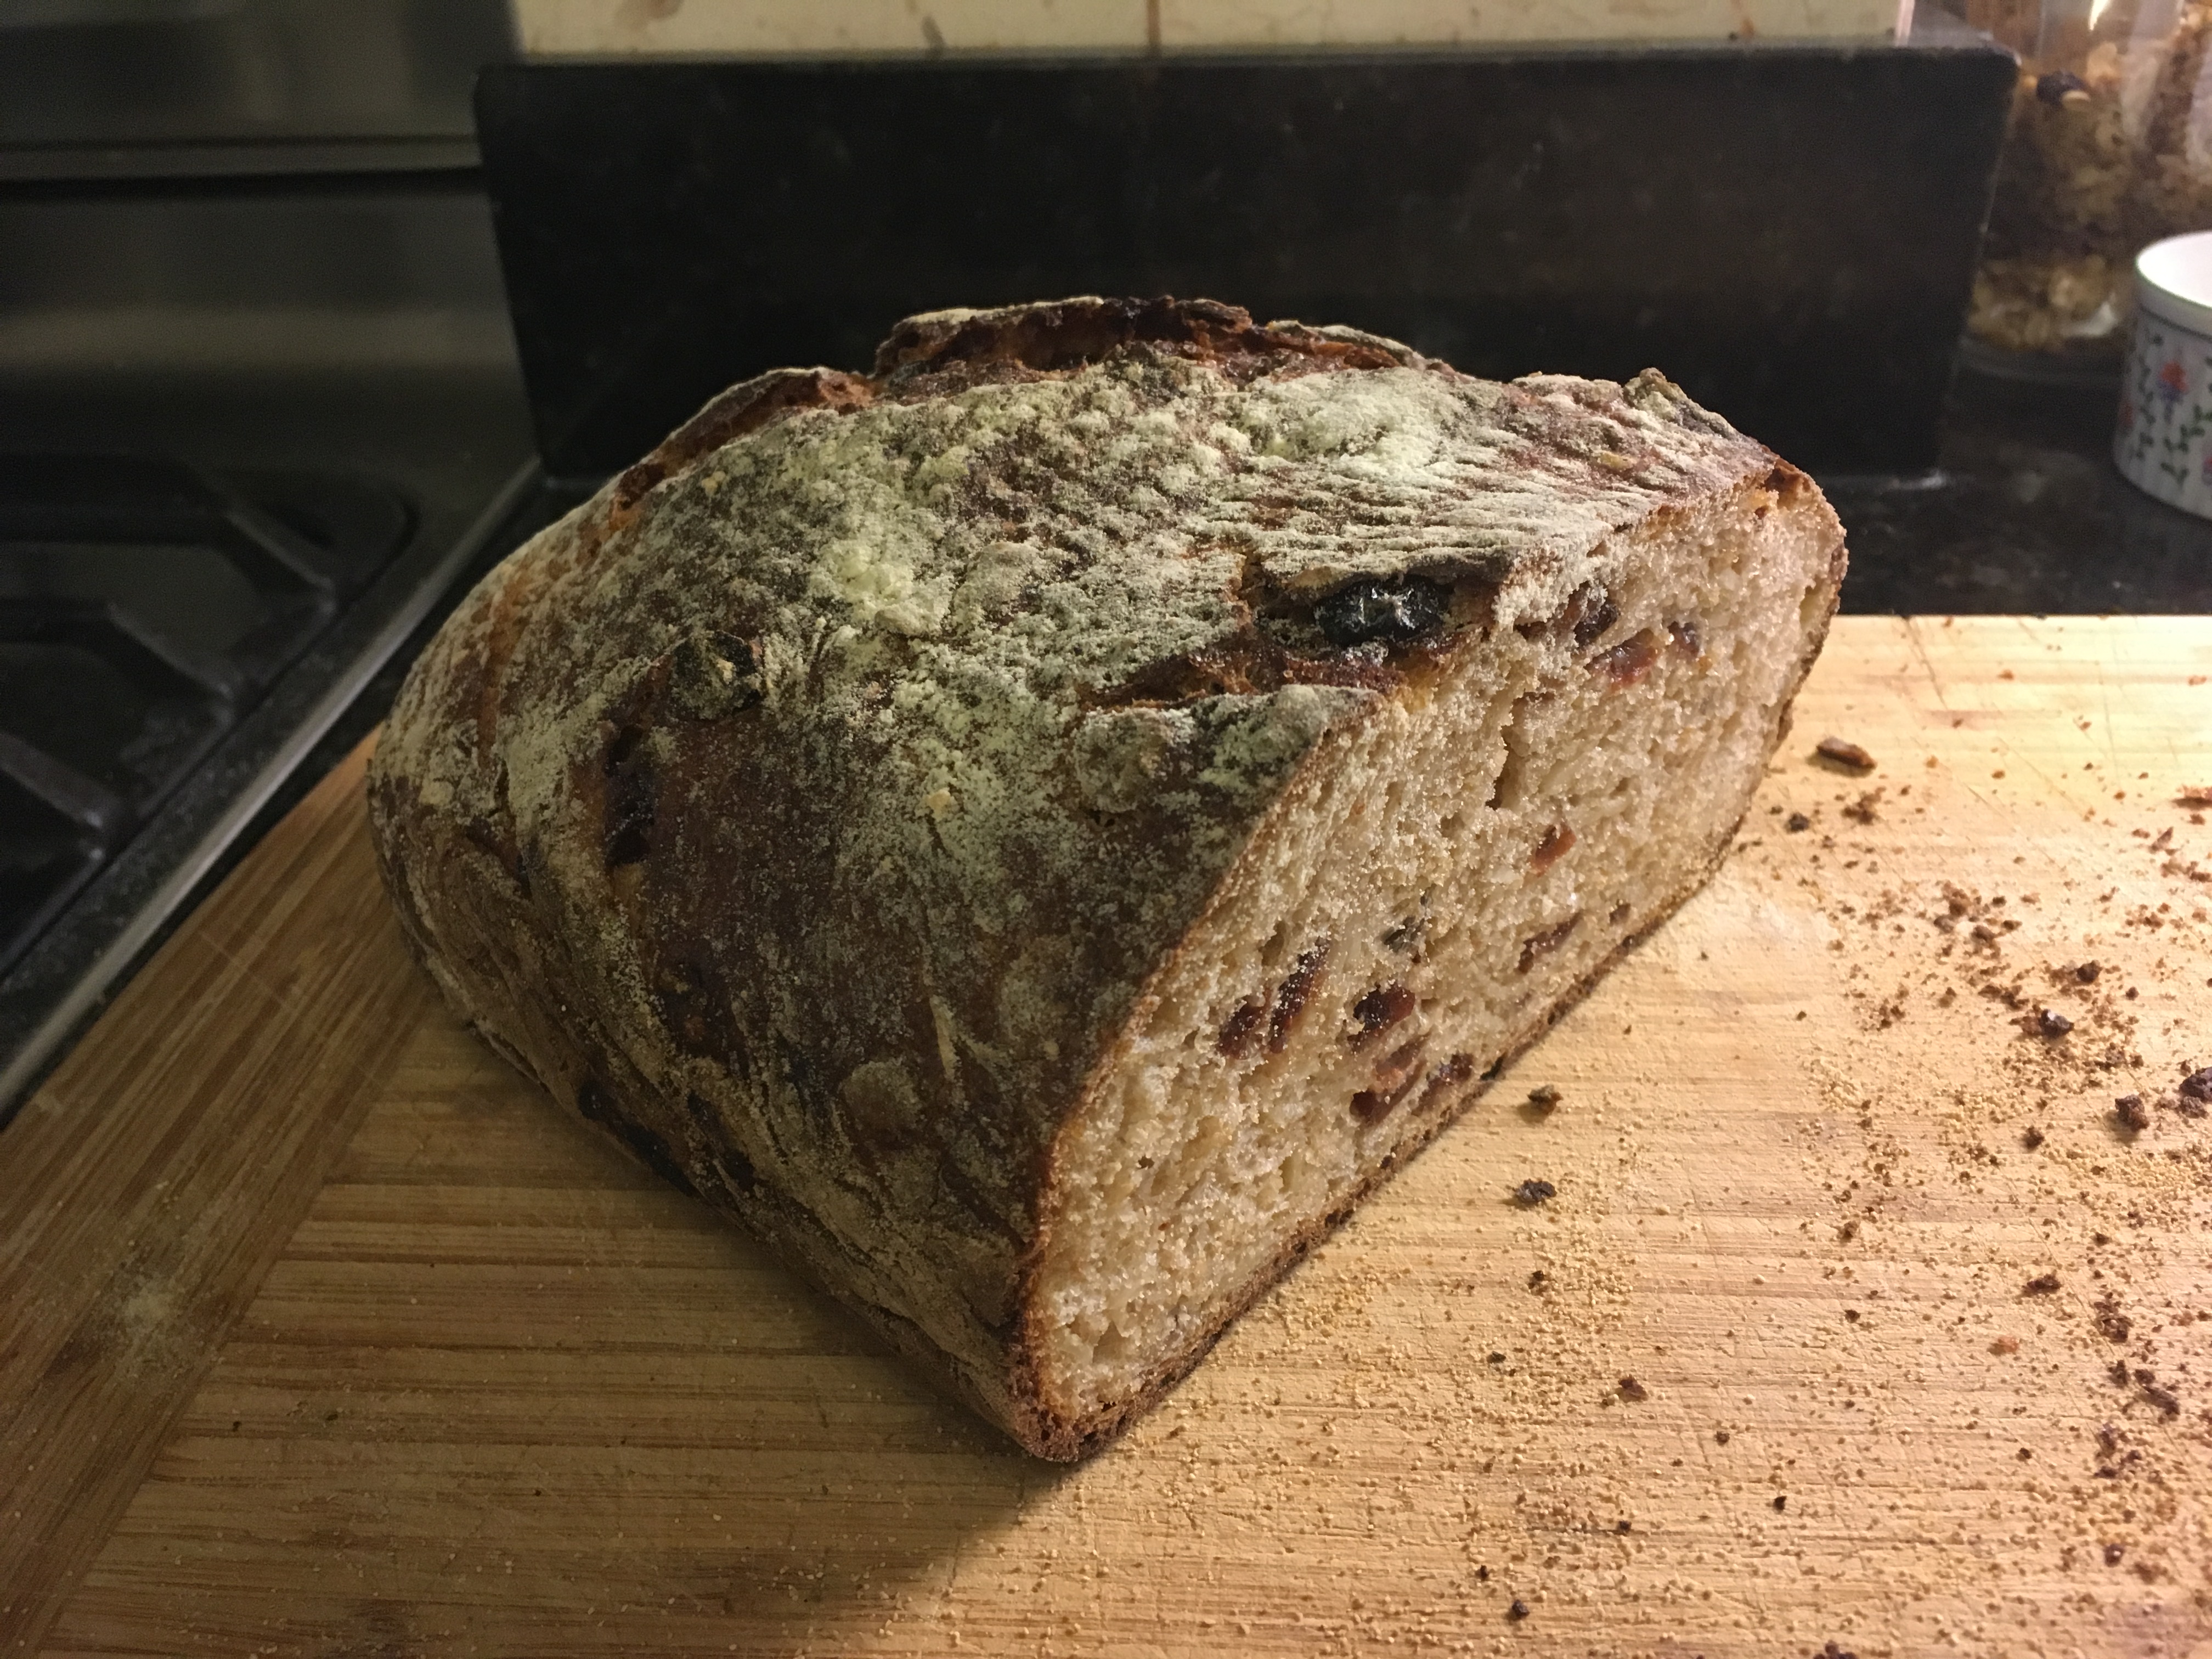
No raisins So substituted dried cranberries. Had way too many sliced almonds so I used those. No Oranges - but three tiny clementines - so zested those and then wrung the juice out of them to substitute for the orange blossom water (must get some!) and the water. And grabbed some applesauce from my preserve cupboard that was at least eight years old.
The dough was a big sloppy mess after the 2nd stretch and fold - but I stayed with it and the end result is scrumptious. Oh and added a bit of salt. Can’t imagine bread without it.
I started this yesterday and baked it today. OMG it was tender, yet had a nice crispy crust. I subbed in/used almond flour, applesauce, orange rind, and a bit of juice from the orange in lieu of orange water. I did add some dried apples, but that added no additional flavor.
The dough took a long time to proof (overnight on a cool kitchen counter) and I baked it in a hot dutch oven. After 40 min, I checked the temp and did need to cook it longer, so I took it out of the DO, and lowered the temp to 350 and baked for another 15 min. Checking the temp along the way. The result was a nice crispy crust, and a delightful tender crumb. So soft, moist and not gummy. The hint of orange was an added delight. Thank you.
Melissa, thank you, thank you for this fantastic new sourdough recipe. I made it yesterday with just two changes to accommodate my pantry. I substituted whole grain Spelt for the Durum and Almond Flour for the whole almonds. I also added a scant 1/4 tsp of cinnamon on the suggestion of bakers commenting here. My warm kitchen in the mid-80s sped up the proofing to around 5 1/2 hours. Despite the faster proof, the flavors were amazing! I appreciate the time you take to make your recipes well-measured, clear, and easy to follow.
You’re welcome! Your version sounds great.
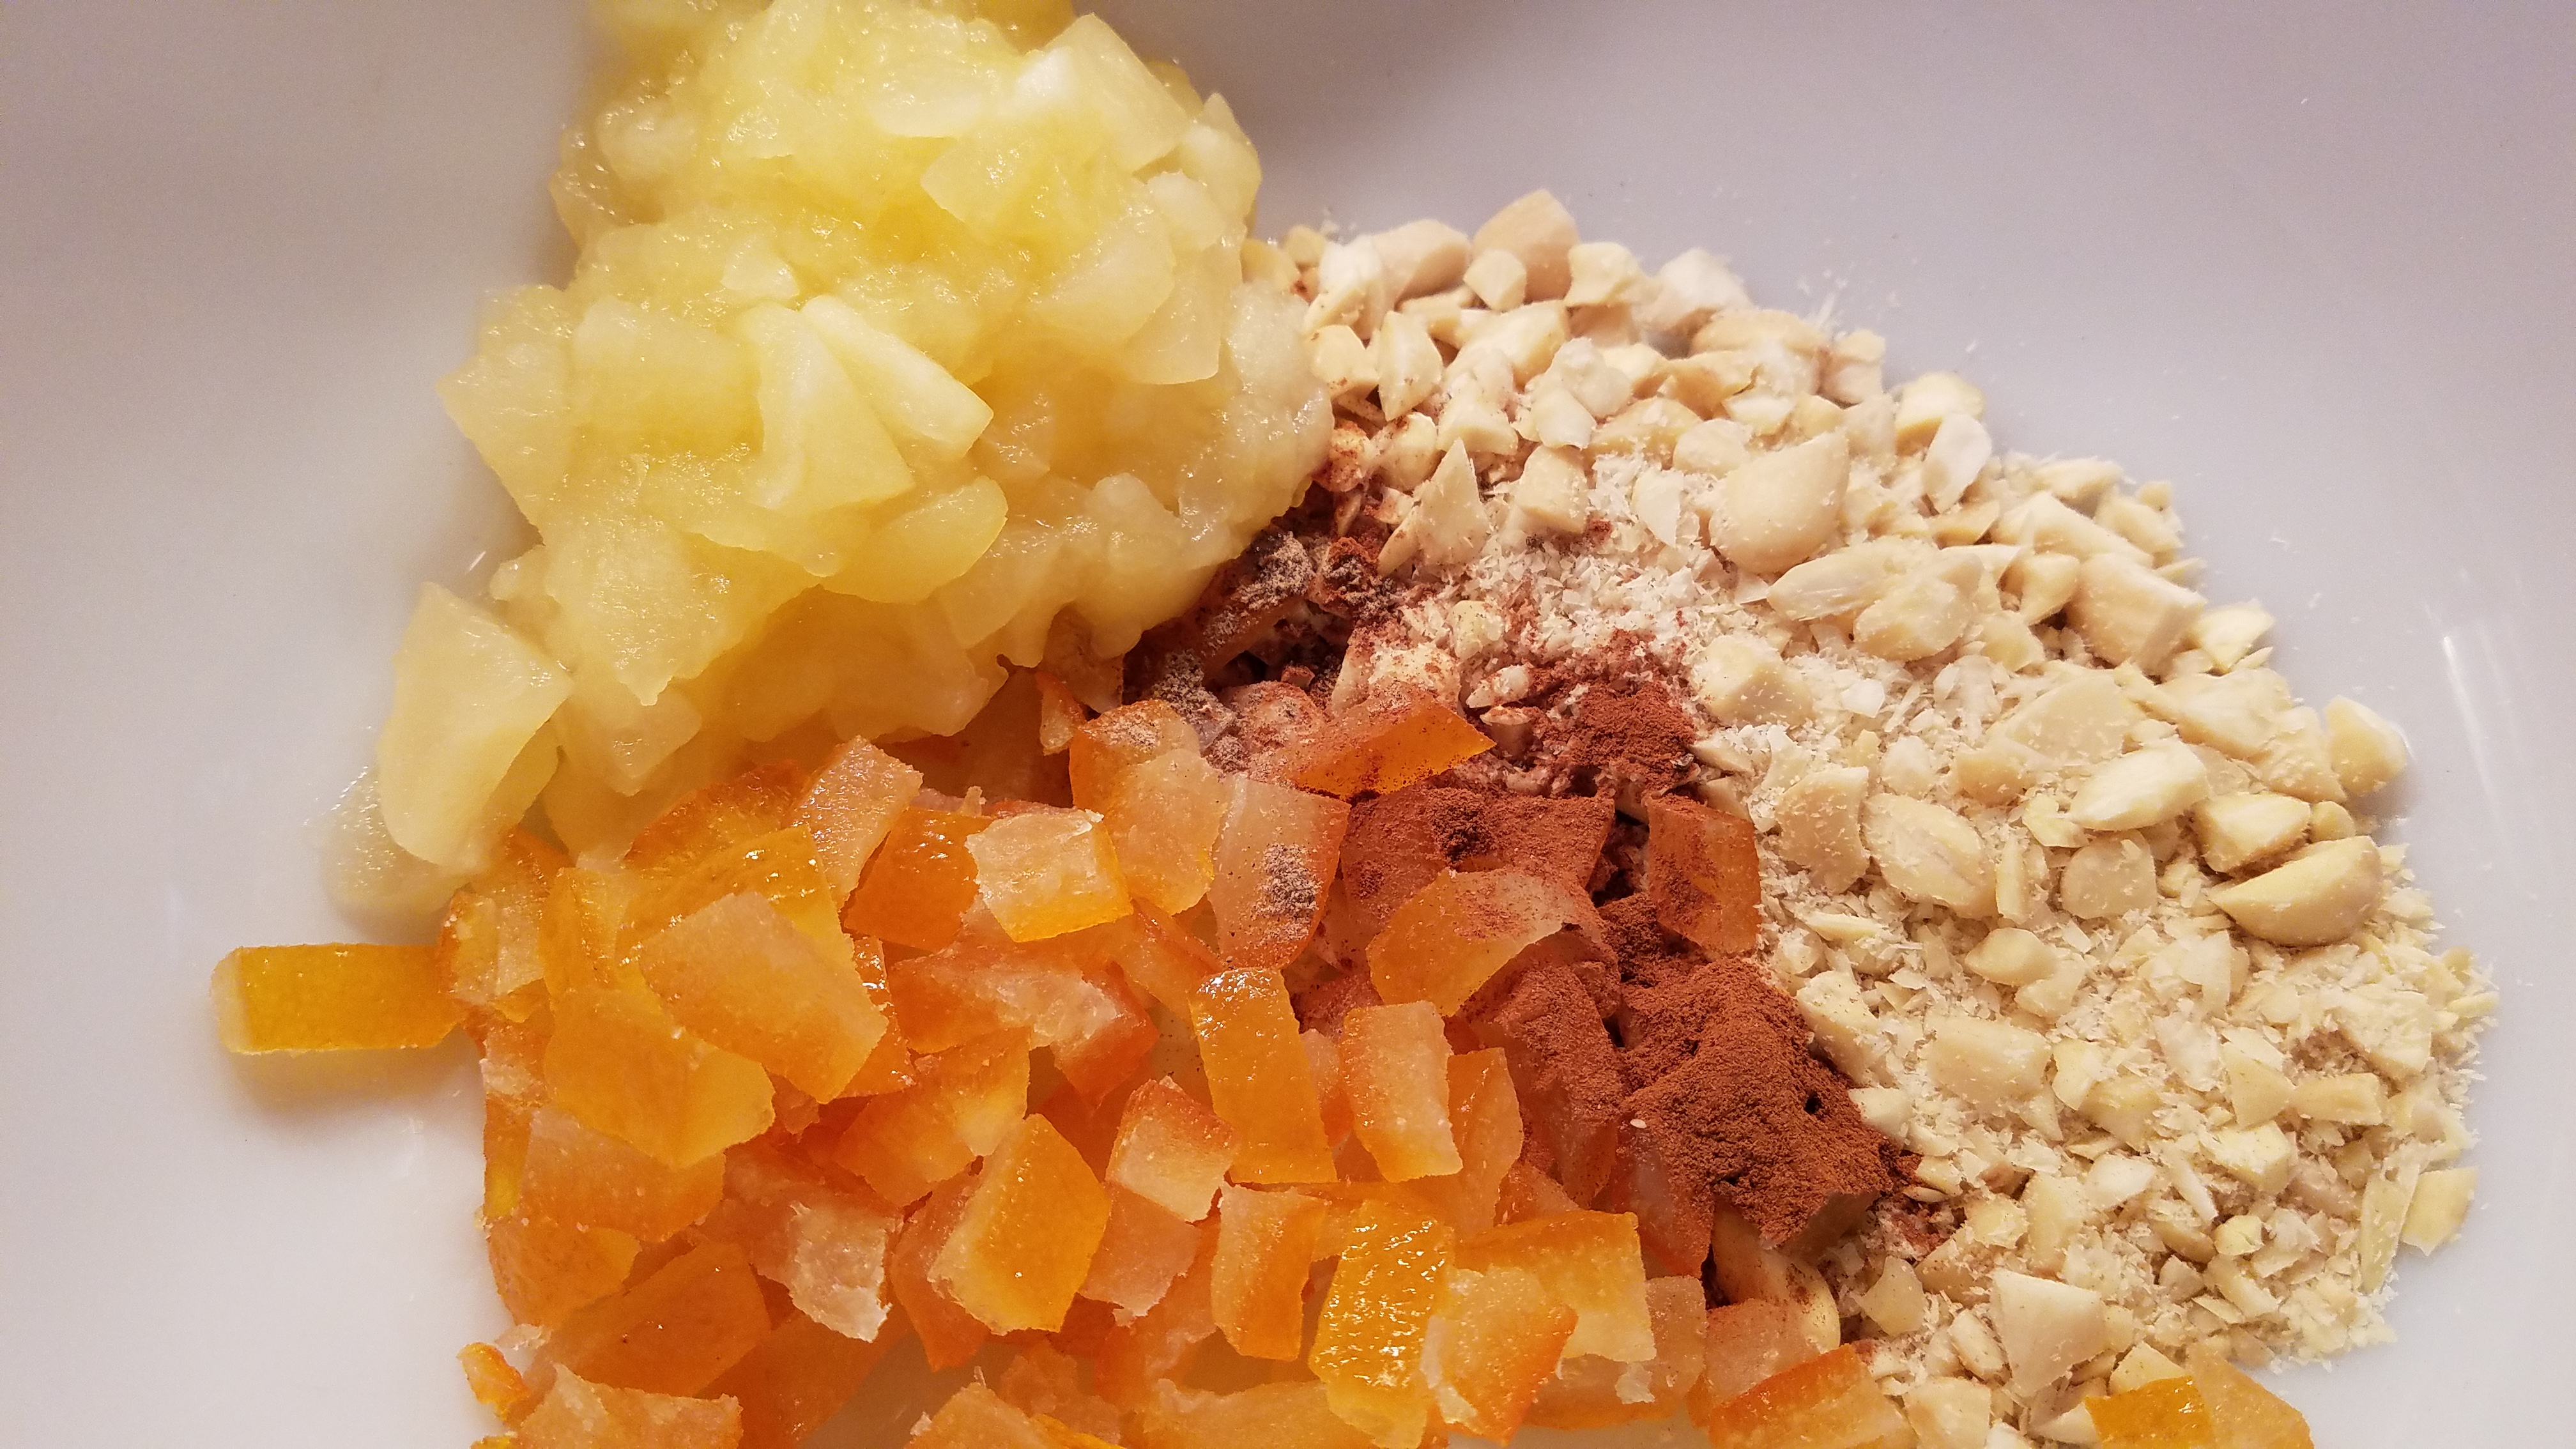
I was inspired to try a variation. This time is i used candied orange peel, 1/4 tsp cinnamon and 1/8 tsp cardamom. Also, Kamut instead of Durum flour. (No raisins or orange blossom water this time.)
I still haven’t tasted it, but here are pics.

I made the first batch and put it on the barbecue lid on the deck to rise overnight. I isoleucine up to find the raccoons had eaten every piece of almond, apple and all the raisins! I didn’t give up, though, and made the next batch early enough to bake the same day.
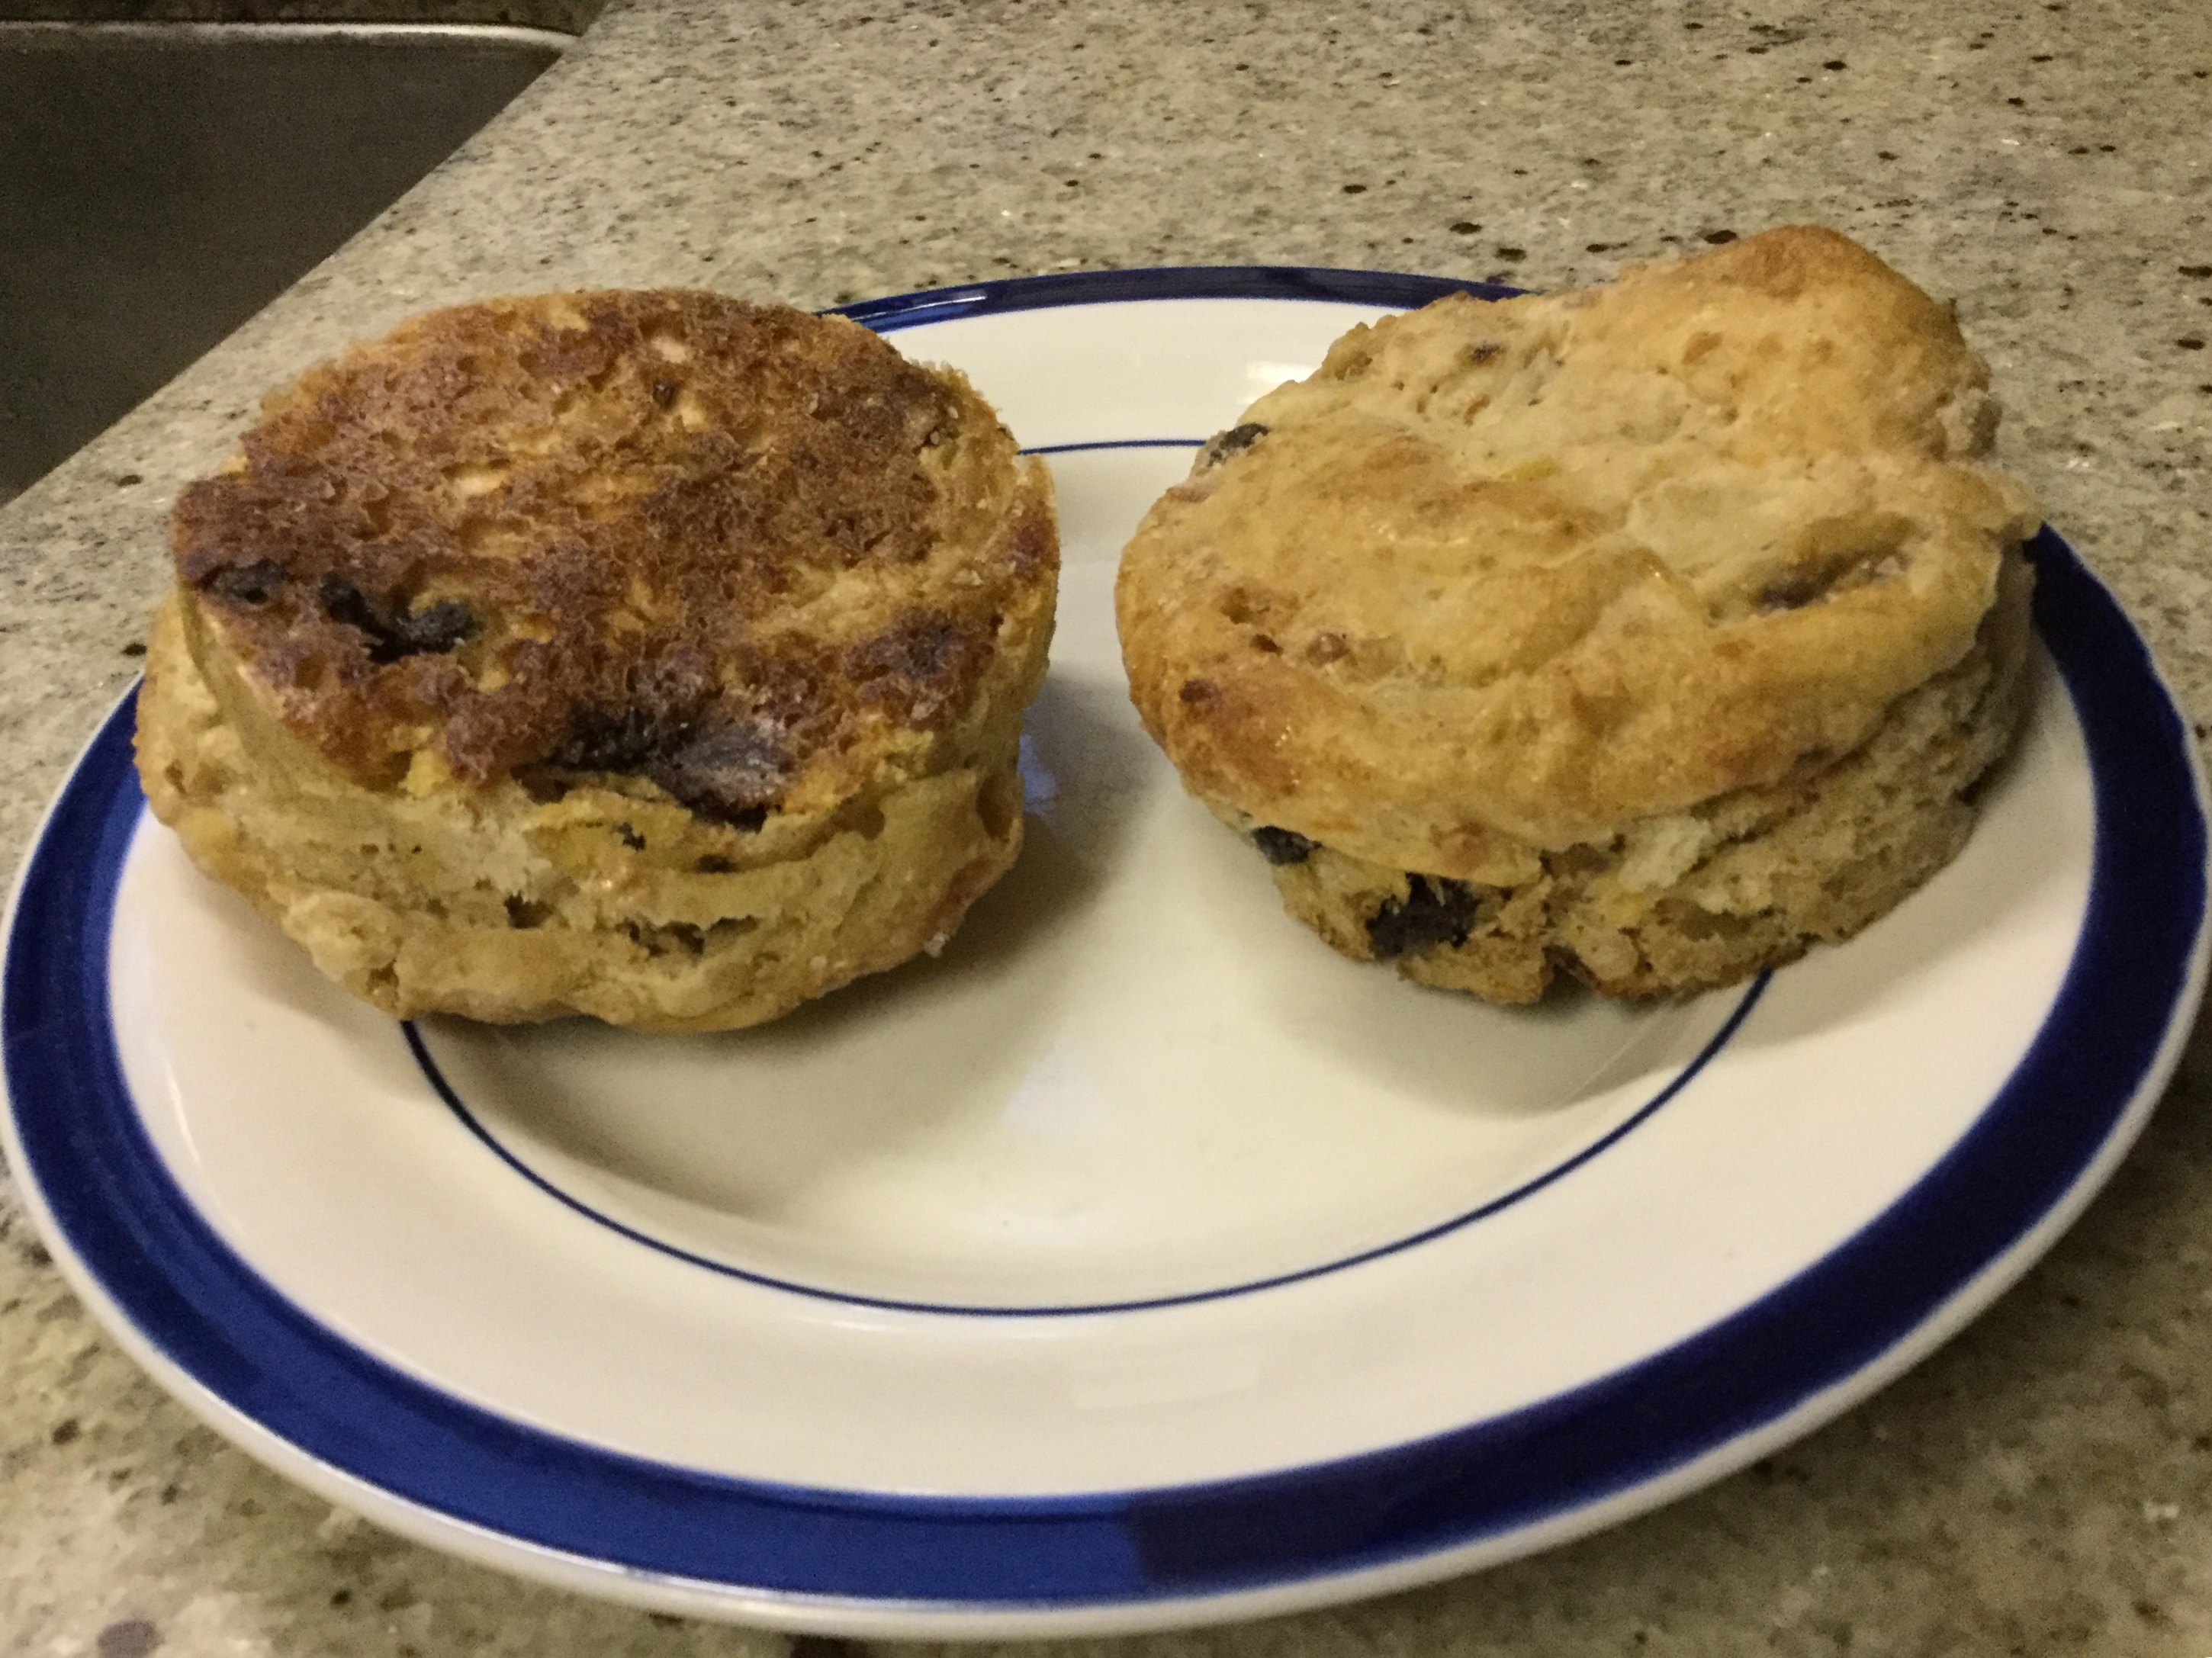
I made them into english muffins, using ten 4” x1” stainless rings i had cut at Metal Supermarket for $20, much cheaper and stronger than the rings I follow nd at the gourmet store.
The dough was ver gloppy, but I weighed the batch 1600g, and made 10 muffins. I greased the rings and put them to rise on a Silpat sheet for 2 hours@room temp. Baked @400F for 15 minutes, lowered to 350F for 20 minutes.
They are incredible!! A crisp bottom crust, and lightly browned tops way over the rings I had to a cut them out of the rings. They are now my go-to breakfast fare.
Wow! You must have been so mad at that racoon. The critter was probably amazed at its good fortune.
What a great idea to make the dough into English muffins. Those look delicious. Lots of nooks and crannies for butter I hope 
Coincidentally, I’ve been working on an English muffin recipe, also using the oven and rings, which I find lower maintenance than a skillet. My cook time and temp is 20-25 min at 425 with a flip halfway (smaller weight muffins). I love how different strategies can work out great.
I mixed this yesterday, baked late yesterday and tried it this morning - Wonderful! My dough was ciabatta like (very slack) probably because of my homemade applesauce which did have some added water and I did not back off the other water. Other than that, I followed the recipe ingredients almost exactly - used orange extract. I adjusted method slightly for what I know works for me - I used a stand mixer. My starter is strong and active - my dough was puffled and doubled in a bit under 8 hours in a 64F location. I followed the preshape/rest/shape/refrigerate but refrigerated for 3 hours and baked right out of the refrigerator which is what I normally do.
I make ciabatta and since this dough reminded me of ciabatta, I did not stress over the slackness. Lots of air when I folded and did the final shaping.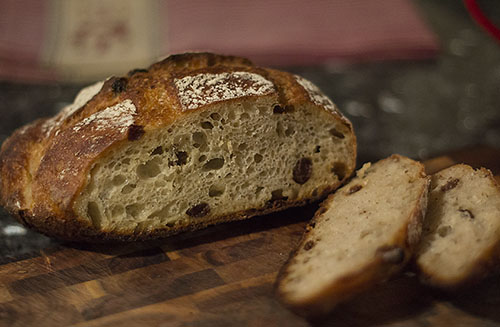
That is beautiful! Looks like you had great handling of the slack dough.
Shaping a very slack dough: I like to use a bench knife and a silicone bowl scraper to kind of scoop and fold - those are the tools I have… 2 bench knives or things shaped like that would work.
This dough pretty much poured out of the bowl, like ciabatta. I had plenty of flour on the counter and just did the folds close to the thirds and then half. I don’t worry about exact shapes really. Covered all up and let it rest. I know the dough has enough flour when it kind of stretches and is smooth even though it really doesn’t hold it’s shape AND is pretty impossible to pick up with your hands. It is the kind of “skin” that holds in the air bubbles. If the dough is really shaggy-sticky - that’s not right as in I think that means the gluten isn’t developed? At any rate, just like kneaded doughs there is a learning curve for knowing by look and feel.
I didn’t write the above for you, Melissa … was thinking about others that commented that the dough was too wet and they added a lot of flour. On that note, I also use a scale - always. And I really appreciate that your weights work well.
Stand mixer - this is for you, Melissa … With this recipe, I intended to follow your method, but when I added the additions, the folding was kind of messy and I said “heck with this” … dumped all in the mixer with dough hook. I started slow, increased to high speed and let it go until all of the dough is on the hook and is whap-whap-whapping the side of the bowl. Then I covered and it was just less than 8 hours after that, that I decided it was doubled and plenty puffy so did the pre-shape. That is pretty much my method for sourdoughwith the mixer and I will often refrigerate overnight before shaping and then refrigerate the final shaped for several hours and the cold shaped loaf right into a hot dutch oven after flour and score. That gives me the best oven spring, crisp crust and good crumb. My aging oven is not sealed well enough to do steam but the dutch oven (Lodge cast iron) does wonderfully for me.
I get very quick rises, even in a cool house (64-66F) but I found that I needed to slow things a bit. Before slowing them I got pretty and tasty loaves but the were dense and heavy. Slowing things down, lightened up the finished loaf.
Interesting - thanks for sharing your method!
Do you mean after the bulk fermentation is basically complete, you’ll refrigerate and shape a cold dough like 8-10 hrs later? I like this idea for time management so I want to make sure I understand correctly. I do see how it would work because in my experience, the fridge does seem to grind the process to an almost halt.
Yes, exactly. I think good things happen during that extra time, plus the dough is much easier to handle when cold. I flour the counter, put the cold dough in the flour and let it warm just a bit … maybe 15 minutes. Then I shape and my shaping technique depends on the dough, but for a typical sourdough I kind of turn it inside out and then a ball and using the scraper pull around the bottom so that there is surface tension. Ciabatta is its own problem and I just try to corral the dough with the scraper after folding. I then put the shaped dough on parchment and into … this is where I get really fancy … a foil bread pan that I’ve opened up so it is kind of oval shaped. I wrap in a towel and refrigerate 4-8 hours more. The stretched out bread pan keeps the dough kind of shaped and helps the refrigerated final rise go up and not out.
Preheat oven to 500 with Dutch Oven inside. After temp has been 500 for 15-20 minutes, I take out the shaped loaf, flour and score and lift it parchment paper and all into the hot dutch oven. I baked the Apple Almond Raisin exactly as you noted but typically, I bake covered at 500 for 20-24 minutes and uncovered at 475 for 12-14 minutes.
And I will store dough even longer in the frig. I bake for just me. (sometimes gifts but mostly me, me, me!!) Instead of halving recipes, I typically make the entire recipe if it makes 2-3 loaves. I might bake just 1 medium boule and store the rest using it through the week for more bread, rolled out for pizza crust, or kind of round and in a cast iron skillet for “English Muffins” or Pita. So, as far as time management - YES - stored dough!
My experience is that the fermentation is definitely slowed but not completely stopped. I store dough in a glass “casserole” with the lid a bit askew. I know some use a bucket with air holes or the lid not completely locked down.
Awesome! Thank you for explaining further. I love the aluminum pan idea to refrigerate the ciabatta dough. When I make in large quantity, I do the couche on a huge cookie sheet and i have to clear out massive fridge space. A few small aluminum trays would offer better flexibility.
I’ve been known to run around my kitchen, looking for ways to hold dough together for proofing e.g. I once used binder clips to hold together the two edges of parchment paper along the top. Also spatulas handles and whisks under the sides of paper to fortify the walls lol.
This is mostly when I make a super long calzone, Rhode Island style. Like you, I sometimes take a big dough, and make a couple different things out of it (except I haven’t taken enough advantage of the fridge).
This calzone is a “this is dinner, folks” bread: sauteed broccoli or spinach, cheese, and a meat like salami. Most definitely a bench scraper wrangle to get it from the counter to the parchment!

WOW! That is beautiful calzone! And yes to channeling our inner MacGyver…

Will definitely make again.
Nice photo! So glad you enjoyed the bread!
Lowering the liquid will help with the handling next time - like you said. I’ve never used rice flour on my work surface before, only in the proofing basket. But I also have had loaves come out with flour streaks in the crumb from shaping with too much? regular flour. It happens - and still tastes good

Thanks for the great recipe.
I used almond flour instead of almonds, and only 100 gms of raisins. Also added a bit (1/8) tsp cinnamon, and a (1/8) tsp of instant yeast, it gives the starter a boost, also shortens the min ferment time - 7 1/2 hrs at 71 F. I put the formed loaf in a banneton over night in the fridge, and baked then next morning. Baking time 37 min total ( last 7 minutes uncovered).
Nice change from my usual wheat levain!
GS
Glad you enjoyed the recipe! Lovely bread (and baking vessel too). All you almond flour substituters are making me want to try it
Today was my 1st with this formula. Since I was missing some of the ingredients, My creation had pecans in place of almonds and extra orange rind since I had no orange water. In place of the 50g water soak with the dough additions, I used unsweetened apple cider. Since I was without Durham flour, I substituted white whole wheat. I found it challenging to blend in the nut, apple, etc. mix without tearing the gluten that had formed so the resulting crumb had more of a sandwich structure rather than the open structure of an artisan loaf. I baked at 480 for 20 min, then 450 for 15 min and 420 for 12 min. The result was a tasty, moist loaf. I think next time I will cut back on the raisens.
I’m glad your loaf was tasty. I too feel it is counterintuitive to add nuts, fruits, porridge, herbs etc. after some gluten development has taken place. It does feel like you’re ripping up the dough. And yet, the Tartine method recommends additions with the second stretch and fold.
So, I’ve gone back and forth in my head about whether that ~hour when gluten develops without the bother of additions is more beneficial regardless of the rip-y addition process. I can’t find where I read someone’s thesis on the benefit of later additions, otherwise I would link you to it. I personally am on the fence, so I vary up my technique a lot.
Here’s a link to more dough addition strategies and results:
This is my favorite sourdough recipe for all time. I was skeptical at first that the gluten structure would hold up to the weight of the added ingredients, but the miracle of organic chemistry produces a fantastic result! I’m curious to know if there are other ingredients in this recipe (apples maybe) that are working to augment the reduced salt (1 percent) and build a strong enough structure to support all the added ingredients? I’ve been experimenting with the main ingredients; increasing flours to 625 grams and corresponding baker percentages, changing flours (kamut), and proportions of whole grains (40 percent whole grain); keeping the homemade applesauce but using different nuts (e.g., ground and whole pecans), dried fruits (sour cherries); and even adding 100 grams of dark chocolate. The result is a large loaf, 3 1/4 lbs, but the high hydration and sourdough fermentation gives this very moist bread a long shelf life of more than a week. I use the large wood pulp banneton for the final proof and bake in a preheated Breadtopia clay baker. Bake time is longer for this larger loaf and I’m still experimenting with tweaking oven temperatures and time to get the best result in the crust while getting the internal temperature to 205 degrees. Thank you Melissa!