Oven warming….
So I over did the bulk formation?
Oven warming….
So I over did the bulk formation?
So oops on the planning ahead… (failure of)
The bread should be going in but the oven is warming. And, it’s a ‘double fault’- just as I’m determining the oven and vessel are both ready- something starts burning…. Guess anyone?
No, the crockpot insert was clean (my first thought)- the flour inside, and outside under the rim was browning nicely. I have no pictures of this mess as I had to move quickly- thank God for Ove’ Gloves- I have 2.
I took the 500F smoking culprit out, brushed out the flour- then noticed it under the outside rim too… somehow in this rush I took my right glove off and managed a small burn to my right index finger when sliding out the oven rack. Glove on, and oven closed, Whew…
Now off to get burn cream…
Awesome first loaf of bread accompanied by feisty, humorous banter. Thanks for posting.
Burn cream that isn’t in its spot…. Because my roommate borrowed it after his own kitchen incident. Rescued from his sanctum and applied.
Ahhh….
Really get yourself a tube of this- it’s Rx only, otherwise I’d recommend it be sold here!
So here is an after picture of my expunged flour, I added a little fresh flour on the side, you know, in case you couldn’t see the toasty parts:
So, back to the main. I figured this loaf is toast (based on the ‘get that darn loaf baking now’ comment- belatedly noticed while oven was still heating) so I got out my parchment paper and inverted the loaf into my hand- why??? because I have limited memory abilities and forgot to turn it directly onto the parchment paper!
Why exactly are we not supposed to eat raw flour? Gotta look that one up.
And since I had sterilized 10 razor blades yesterday and I wanted to make my first attempt at Baker’s Mark, I went ahead with marks- forgetting the ’soak in ice water trick’… (see limited STM) tap water helped (its well water, filtered on site and delicious- no chlorine, etc resume normal breathing)
And here’s my pre-baked baby:
Shaped in the Rustic style of ‘early, addled, aspiring culinary artist’
Into that 500F crockpot with PRE-measured foil on top (see I’m capable of thinking ahead) and time set for 20 minutes.
—-
So breadatopia captured a prolific poster and locked me out of posting this until someone makes a comment- I will pray to the God of lonely Thursday Nights to send me a commenter…
Edit, many adorations to CrustyLoaf
—-
So, I’m rockin now, breads in the oven and kitchen is newly decorated with snow, ahem flour- everywhere… obscuring my camera, my tablet, my ability to find that brand new razor blade…
But I’m feeling quite fine, the rush is over, and zen… except my stylus lands exactly on that tiny burn spot- to keep me on my toes, I’m sure…
Ding and 20 minutes are up. Removing that foil and promptly forgetting to lower the oven temp to 450F as I ponder the timer… According to the recipe I should set it for 10-15 minutes, hmmm, decisions… and here my oven timer wants 1 number… exactly one number….
Setting to 10 minutes figuring my track record to date. Only belatedly (as in 2 hours later) I realize I never adjusted the oven temp… but the time, the time I reasoned through.
So when those 10 minutes are up I inset my handy dany oven probe into the side and it reads out 201, 202- and settles at 204.
The Wheat recipe says to go to 205, the Beginners loaf to 190. My creation has 1/3 whole wheat flour so I’m pulling this baby out and singing my own praises… you slyly smile, knowing this elation is premature…
Out comes the crock and in typing and glancing over at the cooktop I realize hmmm maybe I should completely stop the cooking process and go ahead and lift it out- I mean, maybe that’s why you time baking…
And Viola, her she is:
And just for the mentor of this apprentice, the right side:
![]()
![]()
![]() (sheep was the best I could do for ewe)
(sheep was the best I could do for ewe)
My way of letting someone know I care!
But then it dawns, maybe that probe was on the side and towards the end, because, well, the middle… does the look a bit gummy? Are my hopes once raised, dashed again? I try the temperature probe, 176…. But it has been out of the oven, decrocked and resting for a bit… what is in store at her reveal…
And well the taste… we will have to wait 2 hours for that my friends. So sad… in the meantime my roommate is home and my finger is screaming for more cream…
Prematurely or possibly not! a day worth celebrating with Ginger:
—-
My roommate is Greg, Ginger is the guest of honor.
Admittedly this may be the nearly dead soldier talking, but Ginger has proven herself a worthy dinner, guest, yes guest
As I am well into piece numero dos, and sharing the experience with CrustyLoaf, she has even moisture through her waistline.
Ok CrustyLoaf is verbose, I heard - a sponginess to the dough, yet light and a good saltiness bringing up the flavor, the nice crust adds to the softness inside, the change in texture is pleasing, it proofed well because it is not dense. Overall it was iffy, based on chef’s attention to temperature, but it still worked out.
Admittedly CrustyLoaf is not a fan of whole wheat or other healthy lifestyle choices but he is an accomplished amateur chef in his own right and scrupulously examines flavor profiles and textures. So, in my estimation, High Praise for Ginger! Yipee for me.
He enjoys the loaf and will “most definitely” imbibe again tomorrow. The concern lies between a Ginger more toasty with cherry jam, or cherry jam alone.
For me, with all my mistakes, I’m satisfied with her overall edibleness- yes a very low bar for the aspiring nincompoop!
A few shots of Ginger before she leaves us with all but a smile…
And the money shot:
Critique, rip apart and advise on next steps!
My skin is thick, it’s my brain that’s soft…
Lovin’ my Bread journey, thanks for being along for the ride.
Congratulations! Both on your lovely bread (seriously, that crumb is super) and on telling the hilarious tale of Chef, CrustyLoaf, and Ginger. I promise everything will get easier and less messy with practice, though bloopers seem to happen here and there forever (like preheating the oven accidentally with no baking vessel inside, or only to 350F, or with your dough bulk fermenting in there…melted bowl cover and half cooked dough ![]() )
)
I hope your burn heals quickly – that’s a classic welcome into the world of bread baking. Dominant hand forearms tend to be most at risk, but fingers too.
I think the interior or “crumb” of your bread looks fantastic and that’s a sign of good timing with the fermentation and final proof. Marking the starting point on your bucket is tricky – what I do is after mixing and resting the dough for maybe 15 minutes, I fold it into a nice ball and with a damp fist, smash it down to get a level height for marking to track the bulk fermentation.
You might get a little more height on your next loaf with slightly less bulk fermentation, but my urging you to bake it asap is mainly about the dough temp being in the mid-80s – that plus doubling signals to me that the final proof needs to be fast so the “food” doesn’t run out and the dough doesn’t start deflating.
As you get more experienced, shaping the dough will be easier. You’ll get more surface tension and you’ll need less flour to maneuver it etc. Also if you work with cooler dough, it’s stiffer, less sticky, and also easier to score with the razor.
I can absolutely relate to the “oh crud, where did my razor blade go!”
Fortunately, I have a tiny bit of magnet-friendly space for my Goose lame and a few other items.
I am truly humbled by your comment about the crumb and consider this high praise. I was not expecting this evaluation at all.
Thank you for your pointers as well.
After you shape and smash your dough down, do you then transfer it to your BF vessel, or is it in the container when you do this? What kind of containers do you use?
Why did my dough have such a stringy appearance when turning it out? That was a shock to me too.
I goofed on the flour- I did not need or want that much on top. This happened because I went back and added AP flour to the proofing basket on top of the cornmeal I had originally prepped the basket with. For me this was also a negative when tasting a slice- the raw flour on the crust was off putting.
I learned a lot about flour this round. I will use a fine mesh strainer to flour my surfaces and basket so get a minimum dusting.
I was quite surprised at the bread temp. I wasn’t quite sure what to do. Should I have refrigerated it while I got the kitchen ready?
I did bulk formation in that hard sided container with the lid on. This likely contributed to the temperature problems because I think the ambient temperature of the space was a bit lower. Fermentation would generate some heat, yes?
I should have had a towel on top instead. I did this on my first loaf. I don’t know why I used the lid, except default hindbrain thinking ‘lid goes with container’. I will use a towel in the future.
Loosing a dough during the oven preheat would be devastating- especially if I had plans for the resulting bread (gifting, or just dinner). I can imagine the emotions of the experience vividly.
I do appreciate the heads up. I am prone to this type of oversight, especially when I have other things on my mind. Right now I have only the bread process on my mind and just that is overwhelming my attention to details!
So here I used a saltolyse. Was this necessary with commercially milled flour? Should I use this method on my next try? And then work it in with a longer slap and fold (or is there a more appropriate method?
Or should this be skipped with the type of bread I’m attempting here?
Right now I’m focusing on the practice of techniques. I need to develop hand/arm strength for dough manipulation and that only comes with repetition.
I do have a medical condition that causes progressive nerve atrophy which leads to muscle atrophy and fatigue (muscle fatigue, mental fatigue). I say this only as explanation of my starting point and desire to keep practicing and strengthen the muscles needed to knead ![]() .
.
Technique is important to me and I want to keep practicing. I could start a loaf later today, do you have any suggestions on a recipe, shaping methods to try at different stages of this next attempt?
I won’t file such a play by play again- I was just having fun on an all-around good day!
Oh, and that messy kitchen is just a sign of great things coming forth!
A chef’s badge of honor, or perhaps her welcome mat!
I mix the dough, rest it, transfer, and then flatten it. Sometimes I don’t bother to transfer the dough. I also let it rise in all sorts of containers depending on my mood and the dough size (bowls, dough buckets, pyrex, stand mixer bowl).
That stringy appearance after the bulk fermentation is the air from the fermentation forming a webby network that is held in part by gluten in the dough. This is what you want to see, but if it’s loose and soupy and didn’t start out soupy, then you’ll know the bulk fermentation went too far. The bread baking questions in this FAQ touch on some of this info: Frequently Asked Questions – Breadtopia
Fermentation probably does generate a little heat, but I don’t think much. You can cover the dough with a lid, towel, or bowl cover like the ones in the equipment link above. For multiday processes though, I would avoid a towel as the top of the dough may start to dry out from the air flow. Conversely, be wary of an airtight cover too, as the gases of fermentation can blow off the lid…can even break a glass jar.
You don’t need to do a saltolyse, especially if you’re doing a long (passive gluten development) process. Likewise, the slapping and folding and active gluten development can be skipped if the bulk fermentation is long. Doing the effort has some benefit still but it’s not worth skipping fresh bread if it cramps your style.
This recipe shows the different outcomes of effortful and not effortful dough development:
Many methods of mixing and development gluten don’t require sustained effort. You definitely don’t have to slap and fold every dough. In fact, you can mix the dough in a stand mixer. Let it sit 15 minutes. Scoop it out of the bowl, fold it in the air a bit (video below) and then smoosh it into a bucket. The stretching and folding at 20-30 minute intervals (anywhere from 1-6 times during the bulk fermentation) is probably the most popular method of developing gluten.
You can explore recipe options here but I think repeating a recipe a few times and just changing small things about your timing, temperature, etc may be the best way to learn.I would try a room temp process next perhaps. No heating during the bulk fermentation. Keep it simple and figure out how long a low-tech process takes in your winter kitchen. You’ll enjoy shaping a cooler dough, I promise ![]()
Thank you for all your answers!
My other hobby- creative gardening- took over on the weekend as I went out to source ‘hardwood’ cuttings from a fig and a pomegranate shrub from 2 different people in my city. I’ve not tried to grow these two plants before, much less from cuttings.
Step 1 for the cuttings is complete- their version of ‘bulk formation’ takes months before they ‘need’ anything more than water. Right now the more than 50 ‘sticks’ are nestled together in one fabric pot developing roots (hopefully)! So I’m ready to return to my bread-ucation!
I think I will take you up on your recommendation of reworking the same recipe. I was thinking this myself over the weekend- two loaves does not make a baker, nor the master of one beginner’s loaf. Much can be observed in repetition.
It will definitely be a cooler winter kitchen as our high on Saturday (clipping day) was 65 and the high today was 28. So I will ‘counter’ my covered bulk formation and monitor the rise. I was so relieved to hear that the stringy texture was desirable. I was sure worried about the appearance because I had not seen it in any picture or video (yet). Everyone’s ‘turn out’ of BF was smooth.
I will be back to 100% AP flour as I’m working with what I have on hand. You would laugh at what atmospheric conditions constitute a complete shut down of ‘life as usual’ around here- for the best though, people here just have so little experience with frozen precipitation. A tornado, well that’s just ‘straight line winds that get caught up in their own shadow- and everybody knows what to do about that!. I did manage to get my ‘shopper’ to buy rice flour. It’s often hard to get the right stuff when you can’t shop for yourself. So my proofing container won’t stick- but it didn’t last time either.
Since my dough has been stubbornly silent on the particulars- the BF process can take place in any container and it’s the final proof that does best in a breathable one?
I’m using a BF container that I can ‘mark’ for the learning aspect of dough rise. I will opt for a towel vs a hard lid that sits on top this time.
After BF and kneading, resting and shaping- this is when a breathable container is best?
Or does the dough prefer breathability during BF as well?
Gosh I need to finish my reading assignments!
I do have a question about yeasts. I am using BellaRise instant yeast Red because this was what CrustyLoaf bought a pound of during the holidays - to make one dish. So I’ve separated it into 2 airtight containers- one in the freezer, one in the fridge.
Are there different types of instant yeast? One that will only do 1 rise? There was something about this on one of the NoKnead videos here. But the baker said ‘instant is fine but not a single rise, like ready rise’- I’m going from my (impaired) memory.
Or is it just instant or active? And my instant yeast is a ’single rise’ variety?
I have been thinking of trying NoKnead but I am essentially doing that here.
This round I will do:
1g of yeast, bloomed, incorporated immediately after blooming with:
100% AP store flour, salt and other water (105F-ish)
Long rise
Round shape
Dutch Oven Baking container
ps- 1g of yeast has a pitiful bloom!
Last question(s) on this one. Well in post-production editing I’m changing this to a “Request for a challenge this round, please” :
What kneading method should I do on this one?
And should I do this before BF or after BF, then rest, then shape, then proof?
Or two different ones at different points?
Score one for the scrappy, thrifty beginner- I have a stand mixer with a very new looking dough hook- looks almost as if it has never been used… truth be told- I would rather learn a new technique or practice an old one than rely on a machine (knowing ‘too tired, bring on the tech’ days will manifest themselves, most assuredly).
I think I’m almost set for round 3. I will get out a round colander that most closely approximates the size of the DO- making do with what’s at my fingertips!
Oh- fun news to share- I did decide on which mill I want and that will be my first breadtopia purchase. I chose with longevity and durability in mind. I sought the advice of a person who knows motors for this important decision.
Ut-oh that means I have one more question (if there ever was a red herring…). I read just today that because grains like wheat are ‘living organisms’ you can actually shorten their nutritional longevity by depriving them of oxygen by storing them in mylar bags with an oxygen absorber.
I had never heard this before, but I’ve also never attempted to store grains long term. I do have Mylar and oxygen absorbers to store foods preserved after freeze drying. I was thinking of storing whole grains bought from breadtopia this way- and get out a smaller supply stored at room temp, air tight.
I was thinking of going this route because I could justify buying in bulk (if that is overall more cost effective) and have the flexibility of having more types of grains to play with- knowing what I didn’t get around to using would still be well preserved. I’m also accustomed to using this food preservation method and have all the supplies.
But I certainly don’t want to damage the nutritional value of my precious grains!
Many thanks for your grace with my endless queries and your support through my learning process. I am So Thankful to have come across Breadtopia and especially grateful for the timely posting of a ‘beginners loaf’ on the first page of recipes. You should definitely have this recipe on your home page or a button for ‘bread novices start here’ to guide nervous newbies like me.
I am certainly enjoying the journey!
I haven’t heard of oxygen deprivation affecting grain nutrition. I store my grains in a cool basement in tupperwares. No other special treatment, though I aim to use them within a year.
Congrats on your decision to get a grain mill. The flavor options are unlimited and so exciting. Not just breads – chickpea pasta and more!
Here is more info on storage:
For most bread baking, the process is:
----Here are sample instructions----
Thoroughly mix all the ingredients in a bowl. Cover and let rest 15 minutes, then transfer the dough to a lighly oiled straight-walled bucket, smoosh it down and mark the level on the outside of your bucket. Cover the dough and let it rest for 20-30 minutes.
Do a round of stretching and folding of the dough, followed by another 20-30 minute rest and a second round of stretching and folding. Feel free to do a third 20-30 min rest and round of S&F.
Cover the dough and let it rise until it has grown by 75-100%. I recommend a lid, not a towel so the dough doesn’t dry out.
Shape the dough into a ball. Put it in your proofing basket aka floured tea towel lined colander. Cover and let it rise again/final proof for 1-2 hours.
Bake in a preheated Dutch oven or similar baking vessel.
I checked several sites for grain storage and this information on grain storage was incorrect. if you want to store grain long term (this is after checking numerous well regarded sites) you could can it (if you happen to have a home canner- at like $2k not bloodly likely…) but just as good is storage in food grade pails with mylar and oxygen absorbers.
Mylar is super strong when pulled (think thick versions of the shiny silver emergency blanket) but can be pierced by rodent teeth, knives, etc easily. This is the reason for the ‘food grade pail’. Any container- will work. Some people use this method for very long term storage so they use that type of container- to get them for free go into bakeries, donut shops, places like chipotle, etc and they will more than likely be GLAD to give your their buckets that used to contain icing, dough- just hope you dont get the jalapeno one!
I have sourced these items from many places over the years. Currently I use Pack Fresh USA
That link is to their thickest bag in a set that at the time of writing 1/31/2022, included even a free bag sealer- along with 10 each of 3 sizes of bags. I am happy to write a post on this. People are sometimes semi hesitant on using mylar but it is super easy. I don’t monetize this in any way- I have just been around the block with this saving method for a long while now.
I use this size most often in storing freeze dried foods. They call it a quart but it is 2" shorter than the industry standard for a 1/2 gallon- so holds about 7 cups. I go with the very thick 7mil but that is likely overkill for grains. You put a lot of work into growing food, preping and freeze drying it- a few more cents per bag to store it is worth it for that purpose. I used 5mil bags for a long time without any issues until I found this company. It is cheaper to just buy the bags and oxygen absorbers (link in this paragraph) than the kit that is in the first paragraph. But the kit is nice if you want to play around with mylar.
The enemies of fresh food are light, heat, moisture and oxygen. Using mylar with O2 absorbers eliminates all but heat- you then just have to store it properly. Grains can last up to 30 years stored this way (other foods will vary, but this is also true for rice- 30 years). Moisture is important- Hard red and Hard white are at-or-below 12% moisture so they store very well as do oats and spelt. I can research others- I’m just new to the grains- especially the ones here.
Ola is their customer service support who runs her end from home. Her number (on the site at the bottom) is 919-248-1311. She is very helpful and will talk your ear off (and that is ME saying that!). She might even arrange for free samples.
I can see this being very useful for Breadtopians because all it takes to seal a mylar bag is to fill it, toss in an oxygen absorber and run a flat iron across the top.
So if you brought up some grain from the basement, but it was too much, you just get a small, medium, etc mylar bag in your kitchen, toss in the extra grain, heat up your flat iron, I seal 1/2 the top, toss in the your oxygen absorber, fold the bag to squeeze the extra air and run the flat iron to seal the bag.
I would keep my basement grains in mylar as well. You can keep reusing the mylar bag as you empty it but will need a new oxygen absorber each time. This way the grain will remain as fresh as the day it arrived at your home.
Making Good Bread- Better!
House issues yesterday so I am late in getting to my assignment. Making Bread tonight and typing up the process for reference.
I do have a question about colanders. I have 3 that might work. The one I like best is metal and has a wide flat bottom. It however does not sink into the DO.
The DO is 4" deep and 10" wide. Here are the 3 colanders:
The metal one sinks 1.75" into the DO.
The dark green has a bottom that is slightly convex. It sinks into the DO 2.25" which is at the top of its holes. You can make this out along the back ridge.
The light green colander fits fully into the DO to rest on the bottom. but its holes are only 1.75" high.
Please excuse my ‘nervous nelly’ question here- but which would you recommend?
I have others but these 3 seem like the best candidates. I do not know how much the dough will rise- this would tell me two things:
What height of holes I need.
What width do I need the that fits inside the DO.
This is unknowable (to me) but I thought you might have some insight of the expected rise of the 2nd Proof.
My second attempt that proofed in an oversized basket did not seem to rise much to me. All the oomph may have been used up in the first, very warm, and extended BF process in that try.
If you have an opinion, I would appreciate the guidance.
Thank you!
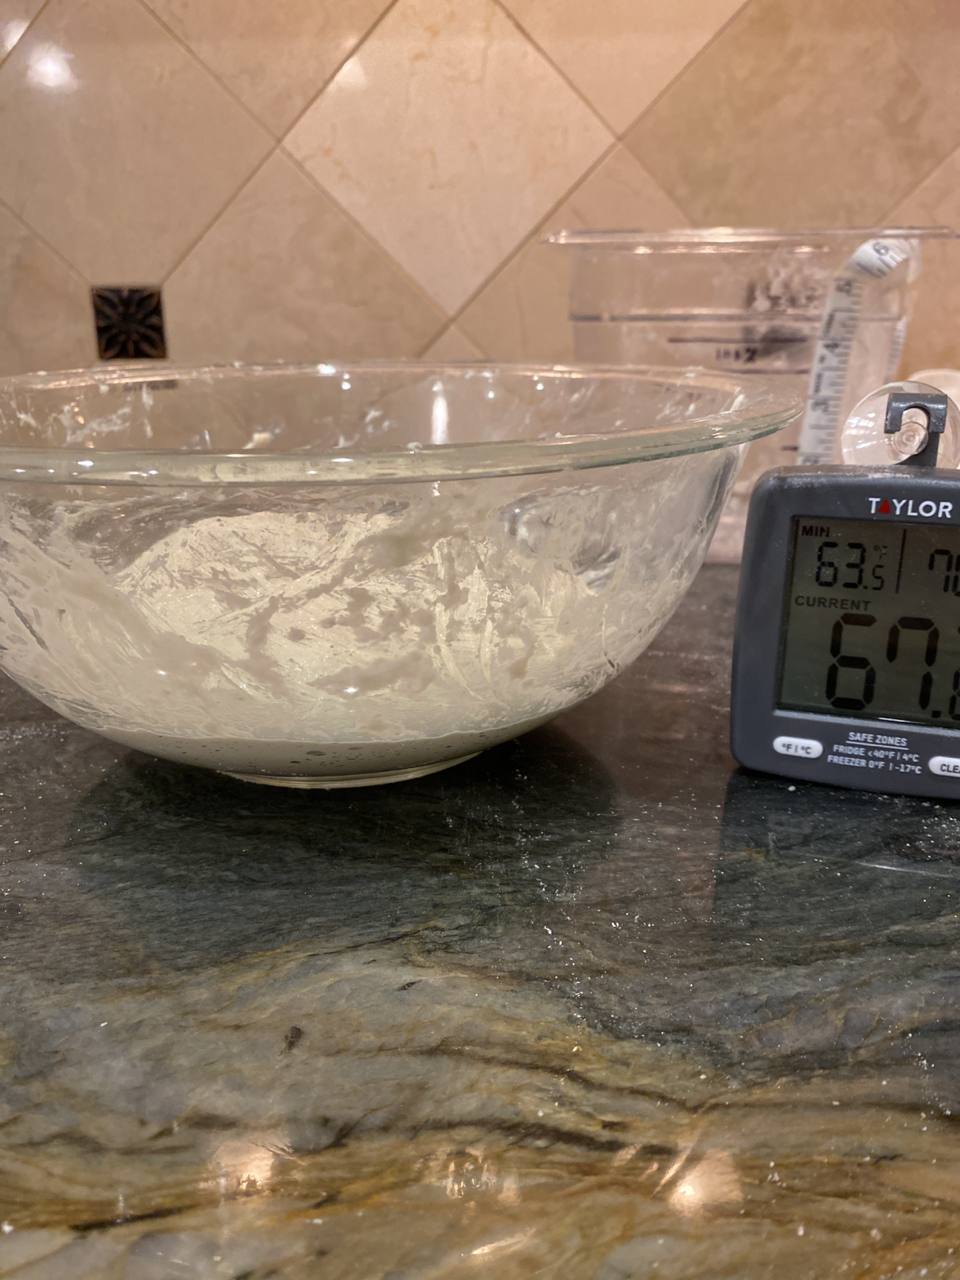
The Making of Beginner’s Loaf #3
Temperature of area where the dough will be prepped, kneaded and proofed in the preceding 24 hours ranged: 63.5F to 67.6F
1g of yeast was bloomed with 5g sugar in 60g of 107F water for 5 minutes
455g sifted AP flour, 9g of salt and 300g of 87F water were mixed with the proofed yeast until combined and set to rest for 15 minutes.
Picture after the 15 minute rest
Wet fingers and removed dough from bowl into lightly oiled hardsided container with lid:
Measured initial dough height at 2 inches:
Calculated a 75% rise would be 3.5 inches, a 100% rise would be 4". Marked those on the container.
As you can see the temperature is 68.9F at the time the dough is left to rise. Timer set for 25 minutes.
After this first rise the dough has risen.
Had to remove dough from this receptacle to do a round of stretching and folding. This is a picture after the first round of S&F:
I realized I chose the wrong diameter bowl for this step so I transferred it back to the bowl I initially mixed the dough in. I had to preform additional stretch and folds to get the dough in the right shape for resting. Here it what it looked like after it’s 2nd stretch and folds after the transfer:
The dough looked like this after 25 min rest following the first stretch and fold:
The second stretch and fold was easier to do but I am still having a lot of trouble with the last ‘pick up and fold over’ part of the maneuver.
Here are two shots after the 2nd S&F, side and top. You might notice the bowl is getting MIGHTY messy- nothing like the clean bowl from the video. I am using some water on my hand but there is goo everywhere. This loaf will be smaller just by attrition…
Rested for 25 minutes and here is the look before starting last S&F
I watched the demo video for the 287th time but this time counted the number of Stretches (4) and then the number of Folds (5) that end with a small, deliberate press at the end. I followed this to the T and this went better- of course the dough is getting easier to handle all the time. My fold over was possibly a bit easier… that’s the toughest part.
After S&F #3
I decided to let it rest in this bowl for 25 minutes before transferring back to the clear square container to finish BF. Here are the shots after that rest.
So this baby was finally allowed back in the secure confines of the hard plastic resting place with lid on to preserve hydration- I gave him plenty of water in all my stretch and folds and the bowl was still a Mighty Mess!
The dough first went into Hard Side at 6:27.
After all the S&Fs and resting he was back in Hard Side at 8:19.
Crusty Loaf rigged up a camera to remotely monitor progress and here he is at 9:27
if I compare these side by side I can see air starting to form in the dough in just this short time. He will remain on the granite without the under counter light on because that light is halogen so its hot.
The cutting boards were in the first shot because I was trying to get even with Hard Side while resting my phone on the counter. They were merely for that one shot. All other times the bowl or Hard Side were on the cold stone.
The temperature did rise in that area early on because CrustyLoaf fired up the oven and range to make dinner- I know… but he has not adjusted to the bread making modification underway in our kitchen. There is an oven right below the space I’m using and I will have to move areas if that is needed while proofing, or adjust my tactics.
So I’m coming to the day’s end as I write this up and see another hour has passed since the last photo so I thought to include another one.
10:17
This is now 2 hours after all that stretching and folding. And S&F #1 was really like 2 sessions with no rest because I decided to switch bowls, so 2 (if counting that way) and 2 more with rests.
The dough seems to be rising awfully fast! I was intending to retire and have Crusty Loaf pick up the ‘baby sitting’ duties- one night owl, one early bird- but now I am unsure. I do NOT want to over proof this dough- I practiced that technique with Ginger.
Decisions… my instructions to Crusty Loaf were to wake me if he got above the 70% mark- if it was closer to 100% move him to the fridge, then wake me. So should I move him to the fridge if this happens in the next few hours? Or go ahead with Shaping and final proof?
The next few hours will tell- this means another late night- the previous few unrelated to this bread experimentation, but no less impactful for the novice.
I’m back and its not good. I live in the house of super proofing dough…
At nearly the 4.5 hours since first mixing the dough and allowing it to rest before initially putting him into Hard Side this little boy is rounding the corner to that 75% line:
11:00
But I rally… early pioneers did not have automatic timers, precise digital thermometers or cameras and they managed bread… I have so many advantages, except perhaps experience and fellow pioneer women!
I’m leaning towards some time in the fridge should this continue… yeah, I know it’s going to continue…
Not good, not good, not good!
It is 11:35 and here we have :
That last view is from the back looking towards the black lines- see how you can only see 1 line, just barely? That is the 100% line!
So we have this view:
The thermometer has not had time to adjust. I will recheck it in just a minute. I am disheartened by the turn of events and unsure if I am making the right move. Maybe I should just fire up the oven and start the shaping process. Yes, i think that is likely the best move to save the dough.
OK- off to put that plan into action.
Oh, the fridge temp is 40F
The Shaping went well except when I turned it out. Well- look:
So I took it out and used the (8" SS plaster knife in my case) to continue to shape. The top looks magnificent- honestly- but the underbelly, not so much. After the second turn out I had the same result- the picture is after try 2.
I was getting some bubbles on the surface but knew that could happen from another video.
So this picture is better
The dough is 2 holes in the colander from the top so I think I picked the right one.
Its midnight and I have the oven already preheating. At least Crusty Loaf will be happy in the morning to awake to a fresh loaf that will be cooled down properly to eat!
Here’s a positive. When I was turning the dough out of Hard Side I allowed it to work itself out of the container- it did a pretty good job- the surface tension of the dough must be pretty strong.
The dough proofed for 75 minutes
It was larger but not firm. It spread out some during the marking.
I lowered it into the 500F Dutch Oven and replace the lid for 15 minutes
Oven temp lowered after 15 min to 450 for 5 minutes
Then the lid was removed and baked for 10 minutes longer
Internal temp was 206 and loaf was removed.
A night full of unexpected things!
2am- off to bed!
——-
Early bird Crusty Loaf was the first to cut into this guy. I invited him to in a note. And here are his pictures:
And for lunch he made Fettuccine Alfredo with Parmesan Toast:
He said the best part of lunch was the toast!
Another comment- “This is SO much better than the Mrs. Baird’s bread you buy at the store!” I laughed. Mrs. Bairds factory is about 15 miles from our house and about the same distance between the factory and our grocery store.
I said “Just wait until I get a mill!”
Thank you for sharing all the grain storage info.
Your bulk fermentation this time looked good. I might have marked the dough a little lower at the starting point (to average the high and low points of the top), but where you did it is fine too.
You can do the stretching and folding inside the bucket if you want, no need to transfer it to a bowl.
You had an impressively late night with this dough. If you ever just want to go to bed, you can put a partly risen dough in the refrigerator and then resume the bulk fermentation the next morning. Or you may even find the dough has doubled in the refrigerator while you were sleeping.
It sounds like next time, if you want an overnight/long rise, you should use the tiniest amount of yeast.
You don’t need to use a colander for the proofing basket substitute, a bowl lined with a floured tea towel is fine too. I’m sorry for the confusion.
The purpose of the proofing basket or “banneton” is to support the dough in it’s shape as it rises a second time, so you don’t want anything huge or tiny compared with the dough.
Breadtopia’s standard sized baskets are 9 inches inside diameter at the rim.
The final proof of most yeast and lean (not enriched) dough lasts between 1/2 hour and two hours, depending on the dough and room temp.
With more experience, you’ll be able to shape the dough with less flour and get that boule shape without having a flour-filled seam that doesn’t close up.
Your loaf looks fantastic again though. Good job!
Thank you, again.
I was really crestfallen with the BF because I thought it was supposed to be a long BF with the directions you provided- so I felt I failed in this respect.
My stretching and folding needs a lot of work. Will gluten development techniques cause a faster BF?
1g of yeast is an awfully small amount. I have a medicine scale that goes to 0.00g so I could go low, but how low is too low?
Did I need to bloom the yeast for this?
Should I have used warm water (85F this round) when combining all ingredients?
The final boule was not perfectly round and the sides that touched the DO were darkened (none of the shots show this). But they did not taste burned.
The dough did not fully set up- I mean if I left it on the parchment 5 minutes I think it would have spread out. At which step could I have improved to make a stiffer dough? Is a stiff boule what we are going for?
That container is only 4x4” wide so to S&F within is nearly impossible- my hands are ‘medium’ in glove size but I am 5’11” so my long fingers, etc nearly fill up the bowl- for example my fist to push down the dough early on filled the container.
I though proofing baskets let the bread breathe- so you need holes or a breathe-able container in this step. A plastic ‘hard side’ 4x4 container or a glass/ceramic bowl would not provide this. I do recognize the bowl you use in the video- my grandmother had those. I wish I had them now. I don’t know what became of them.
One thing I was impressed with was the Bakers Mark. I enjoyed doing it and I liked the outcome.
Oh and rice flour on the tea towel was a complete fail- I made sure to get as much of it as possible off my proofing tea towel and off the loaf after the proof. You are wise to keep your shelves free of this menace!
It’s not your fault that your dough rose so fast!
Using cold water and skipping the blooming step will indeed slow things down though. And yes, you can use very very little yeast too.
A BF that leans toward only 75% expansion and a dryer dough – use less water – will allow you to shape easier and give you a more upright and stiff boule. With less water, you will likely have a more closed crumb (less holey interior) so that can be a trade-off. Unless you want tight crumb bread for sandwiches etc. no butter leakage.
For stiffness, you can also refrigerate the dough during the final proof. This slows things down and keeps the dough from spreading as much when you turn it out of the basket.
Many people do this refrigerated final proof with sourdough. It is possible with yeast too, but I personally don’t have a sense of the right timing – how fast a yeast dough will rise even in the cold of the refrigerator.
A quick cheat is to put the proofing basket in the freezer for 20 minutes during the oven preheat.
Here’s a photo gallery from a recent recipe we published. You can see the before and after pics of the dough in the basket. Not much change, but some.
The center of this loaf had a closed crumb. I have only seen pictures of the end pieces and they have more holes. Both ways work for me.
My medical background steers me towards a precision approach- technically correct at every step. Good for patient care, I need to loosen up for bread making.
Do you think a change in one of the steps I did would have produced a higher rise in the final product? I think the rise was adequate but could be improved- do you agree?
Do you mean freeze the empty proofing basket for 20 minutes?
I started my oven with DO as I was removing the dough from the fridge where it sat for 10 minutes in my ‘changing my mind, what to do’ period. With shaping and rest my oven was up to temp 45-60 minutes before the dough was ready. This was not a problem but in the context of the proofing basket in the freezer at the same time as preheat confused me.
I guess I should try again with less yeast, or the same, practice S&F (or a different gluten technique) oh- in doing 4 S&F, because the first two were necessitated by changing the bowl, affect the outcome in a certain way?
How does more/excess gluten formation affect the process?
What container is customary for BF?
Freezing the proofing basket with the dough in it for about 20 minutes just before baking makes the dough stiffer, and therefore it tends to splay less. This is not something I do often, but it’s a tool to add your wheelhouse, especially if you over ferment/over proof a wet dough = floppy.
Gluten development usually makes a taller and more open crumb bread as long as fermentation is on point too.
I’m losing track of links I’ve posted – my apologies if this is a repeat! Also, I don’t think your bread was dense, but I do think this FAQ is helpful ![]()