I first read about the aliquot jar on @fullproofbaking Instagram feed. I decided to start using it and have found it extremely useful. Early this summer I found that I was overfermenting my dough and I wasn’t compensating for the warmer weather very well. That was when I decided I’d start using the aliquot jar so I could fine tune my baking.
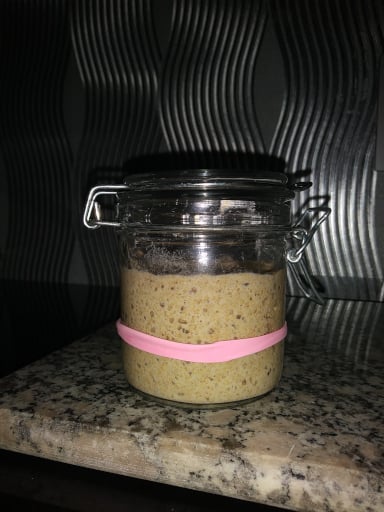
An aliquot is a small portion of something, so for the aliquot jar the dough is a small portion of the main dough. Generally I removed approximately 30-40 g of dough after I have done the first stretch and fold. I do a bit of stretching and folding of this small bit of dough and then place it into a small jar. That small jar ideally would have parallel straight sides and be relatively narrow. I use a specimen jar (clean of course) that I have placed 10 cc of filtered water into. I place the water in it because I find that you can then more easily remove all the air bubbles from the bottom of the jar that might affect your reading of the jar. So I firmly press the dough into the jar and do my best to flatten the top out then I pour off the excess water. If there is a bit of water on top, that is totally fine as long as it isn’t higher than the dome of the dough. In fact having that bit of water on top can make reading the level of rise a bit easier.
For the next step you will need a second identical jar. Tare the empty jar on your most accurate scale and then fill with water to the same level as the aliquot jar with dough. Measure the weight of the water. Then you can figure out very precisely what 50% rise or any rise is. So if the weight of water is 30 g then 45 g of water will be a 50% rise. So add water to reach a weight of 45 g and that is the height that the dough will need to reach 50% rise. I use the syringe to be able to add very precisely the weight of water needed. Of course you could just measure in mm the height of the dough and then mark 50% rise by measuring and marking. But using your scale and water is more precise and actually easier to do.
I typically will have some painter’s tape on the aliquot jar and mark the original level and then 40, 50 and 60% rise so I can follow the rise of the dough. I hope this post helps a few bakers out.
Interesting, Benny. I wonder if I need to be that accurate vs. using a lined cylindrical jar to measure bulk fermentation? If the purpose of stretching and folding is to develop a lattice structure of gluten to hold CO2 and water, wouldn’t the dough in the bulk fermentation possibly have a different rise than the dough in the bottom of your Aliquot jar?
Yes there will be a difference in rise between the aliquot jar and the main dough because of the coil folds/stretch and folds that you apply to them. You are also correct that if you have a good container to bulk your dough in that you can accurately gauge rise with nice straight sides that are parallel rather than angled, then you can definitely just use that. However, many of us don’t have Cambros or other ideal containers for bulk. I just a square Pyrex dish and cannot use it to gauge rise at all, so instead I’ve been using the aliquot jar. I’ve chosen to use the Pyrex because I like to coil fold and the shallow shape is ideal for this. Also, I find that it releases easily from the dish when it comes time to shape. Anyhow, I thought I’d share what I’ve been doing for others who may not have an ideal container for bulk. Thanks for having a look at my post.
That’s really neat! I may employ this technique for experiments when precision of fermentation between two bowls of dough is super important for the validity of the results, and also super hard to gauge by eye, especially if/when the two doughs become staggered in fermentation speed.
Yes Melissa, I could see this being very useful if you are doing experiments and the doughs are staggered. I have found this level of precision very very useful in baking Baguettes where I have found a 5% difference in aliquot jar rise to be “clinically” significant. I hope you try it and let me know what you think. I was hoping that it might help a couple of bakers who might be struggling with bulk fermentation especially now that we’re heading out of summer and into fall.
Even the Cambro are difficult to measure fermentation progress. So question for you - could you place 1 oz of dough after all the folds ( FWSY - Overnight Country Brown ) into the jar? I watch your video in the meantime. Thanks !
Hi Paul. The amount of dough you place in the jar will be related to the width of the jar. If it is too wide, then the height will be too little and it will be exceeding hard to measure a 50% vs 70% rise. Using a narrow jar is key, wide enough that you can get a finger or two into to press the dough down firmly, while narrow enough that a change in height can be measured well enough.
I use the specimen jars we have at the clinic which I’m told are food grade plastic and they are a perfect size for use. Anyhow, I use a ball of dough that I stretch and fold in my hands before I ball up and press into the bottom of the jar. The dough is about 1 oz or 30 g I believe. It’s all in the video.
Benny, I’m glad that you introduced the aliquot jar to me. I found spice jars on Amazon which were the perfect shape and size. I also have a very inexpensive caliper which makes measuring the % rise a snap.
Richard
Ah that’s great Richard, I hope you really find it helpful. I know I have really improved my baking since starting to use the aliquot jar this past summer. I’m now really using it into final proof as well. My last bake with the 75% whole red fife I left to proof warm until the aliquot jar showed 80% rise and I was so happy with the results. I’m going to continue to use it, not only for measuring bulk but also for when to end a bench proof and to start cold retard.
Benny
Ah, Benny, you must be an internist with everything so precise. I’m a psychiatrist and am more interested in how things feel, although I do like using the aliquot jar when I have inclusions.
Richard
I’m not an Internist, but I am a Family Physician specializing in HIV primary care. So much of my practice as you can imagine is Internal Medicine and ID but tons is psychiatric since I’m in primary care. Nice to know another MD on this site. So I am a bit of both, I like precision, and love that the precision has taught me more about how things feel.
Benny
Likewise I found the aliquot jar idea useful but came across a limitation yesterday when baking now that the weather has turned cooler. The dough mass in the jar gets upto ambient temperature much quicker than the main dough mass. I found that when I did bench folds and lamination the main dough mass lost temperature in relation to the aliquot jar, so this method is great if you are using a proofing box because you don’t have suitable ambient temperatures.
Alternately I could just remove these cooling bench contact procedures from my method.
Yes that is a potential limitation, however, you can limit it somewhat by keeping the aliquot jar in contact with the dough as much as possible. So if you’re doing a lamination and the room is cold, take the dough and aliquot jar out and place them both on the countertop. Now during a lamination the dough will get colder than the aliquot jar. So once you have folded the dough up and place it back into it’s bulking container, place the aliquot jar in contact with the dough in that container. The aliquot jar should come close to the dough temperature if there is enough contact. It is one of the reasons I like the plastic of the specimen jars I use, the heat capacity is lower than that of glass so it should cool down and warm up more quickly than glass will.
Benny
Benny ran across your post by accident and reminded me of a post on Freshloaf years ago. I use a Aloquot jar anytime I am making a bread where I will be manipulating (somewhat deflating) the dough during the bulk ferment. Other than that I use a graduated container to “MEASURE” the rise. All recipes give you a “let rise to double in size or whatever” which is a volume measurement. It can be measured with a ruler.
The jar does have to be small yes but weighing water in a second jar is not needed. Stick your 30 to 40g of dough in the jar, push out the air, mark the start and measure to where you want it to stop. Easy Peasy. Been doing for years and works EVERY time.
Hi Dennis, I was being so precise because when making baguettes I wasn’t just looking for doubling, I was looking for smaller changes such as 20 or 30% rise.
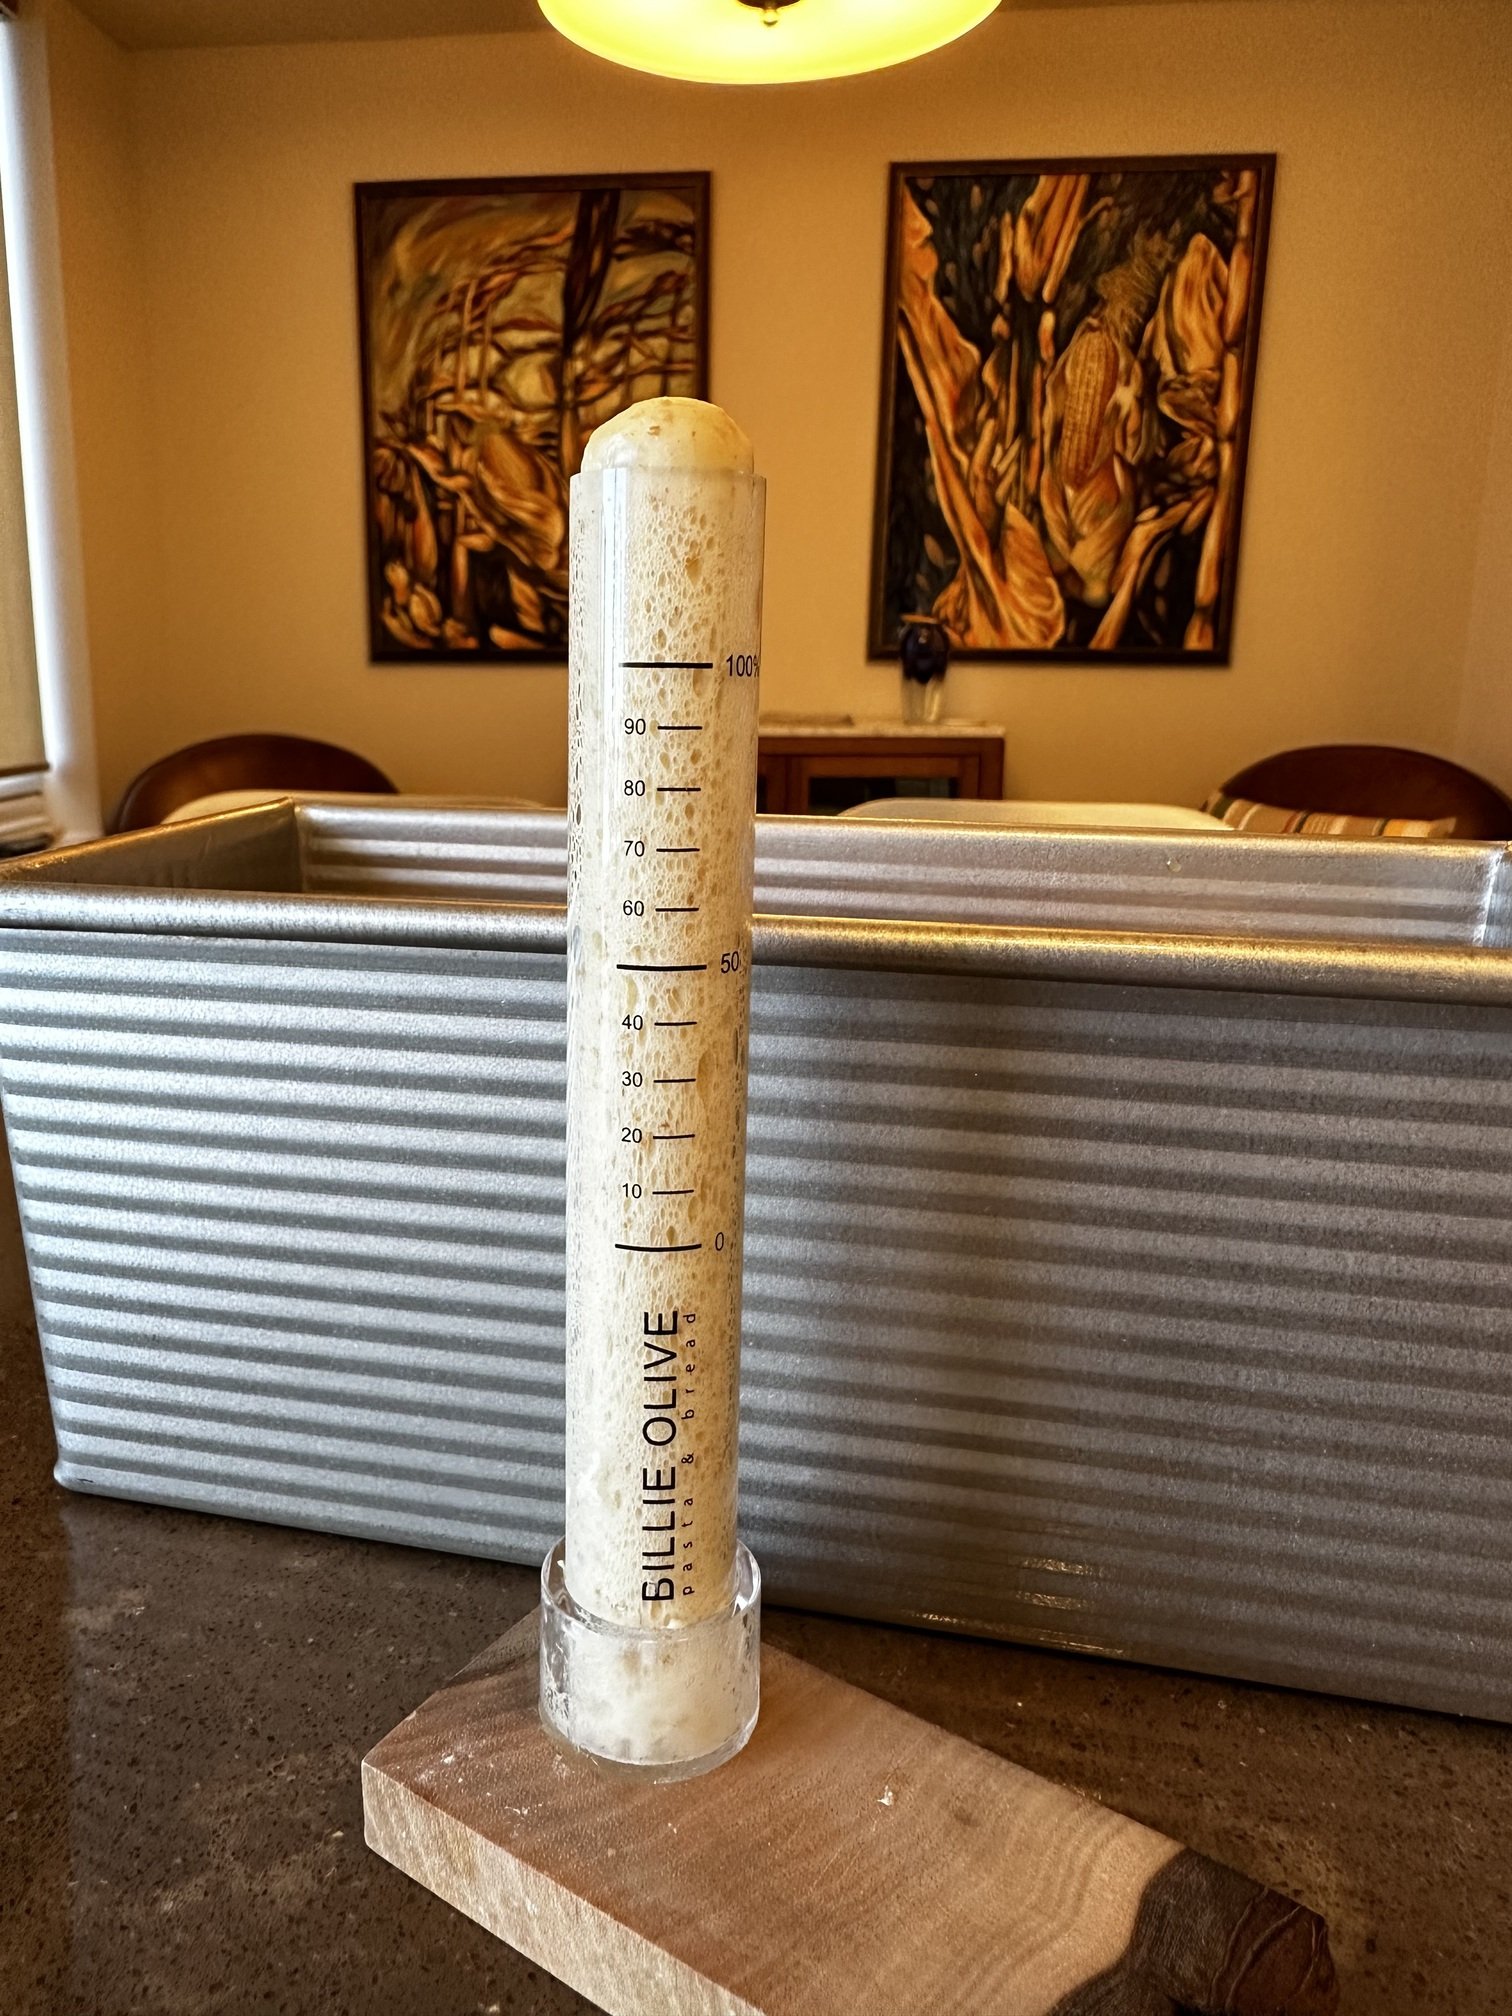
In any event, I now use a marked aliquot tube that I was sent by the manufacturer to test when they were starting work on them. This is nicely designed to assess smaller changes in dough growth.
Diane never had to deal with those in her practise so I was unaware of those specimen tubes. Must be fun packing a lump of dough in the bottom and getting the fermented dough out…hahahaha!
Actually it is quite easy to load and then clean. It comes with a vacuum pump, like one that removes air from a bottle of wine to pull the dough into it. Then there is a plunger that pushes the dough out.