This is the comment thread for the Breadtopia blog post originally published here:
This is in reply to Sherry’s post asking what she did wrong with her bread baking. The only thing I would say is that even though you don’t have a proofing basket for the second rise, you can simply fashion one out of a bowl with a well floured cloth draped in it. Proofing the dough in a bowl will keep it from pancaking out on you like it did. Also you probably don’t need to proof it for 2 hours. Mine is usually ready in about an hour or a bit longer. One of the most important aspects of the no knead technique is baking the bread in a covered baker of some kind. Preferably one sized properly to shore up the dough from again spreading out while baking. Wet dough will do that. So a smaller Dutch oven, in your case, probably would have helped, but also putting the dough in the preheating upright bottom and covering would have made it easier and helped too.
Also, in answer to your question about baking 2 loaves, you can just double all the ingredients and divide the dough in half after the long proof so the 2 balls of dough can proof separately for the 2nd short rise. They can bake at the same time if you have room in your oven.
Wow! I made our first loaf with the new sourdough starter and followed the Sourdough No Knead recipe pretty close. I used All-Purpose flour because this was all I had on hand. After the first 3 hours, I refrigerated the dough overnight. I pulled it out of the fridge at 8 AM and let it come to room temperature (80°F) for 10 hours. The dough was very wet, but I decided to continue with the basic recipe. I used a wicker basket with parchment paper for the second rise. Then I was able to lift the very wet dough with the parchment paper into the pre-heated stone cloche. Since we are at an altitude of 2500’, I decided to cut 5 minutes from the baking time with the cover, then finished with 15 minutes. The internal temperature was at 205°F when I pulled it from the oven.
Next time I’m going to experiment and try to get more of an oven rise. I think I can do this with some additional gluten and maybe ½ cup more or flour in the dough.

2 Likes
Great job of improvising.
I have been using this recipe for a few years now sometimes with success and others-very little success. For the most part though, the bread always tastes good, its just ugly. I have 2 things-probably 2 posts, but I will try to get it with 1. 1) I follow the baking times exact, and I get an unusually dark crust - Do I shorten the covered time or the uncovered time? I have tried it both ways and normally I end up still with a dark crust but a “gummy” center. 2) I am having trouble getting a good tasting result with using this at 100% whole wheat flour-normally way to dry. Has anyone had success revising the ratios of flour and water or the baking times for this?

I actually had some pretty great success with this recipe. Was very relieved because it was my first time using this starter. I would like to attempt one with more of a whole wheat ratio. Probably a combination of Rye, Whole Wheat, and White Flours. Any suggestions or advice before I just go for it?
I have had good results starting with this recipe and adapting it for anywhere from 50% to 100% whole grain. My experience is that as you up the percentage of whole grain, you probably want to increase the percentage by weight of water along with it.
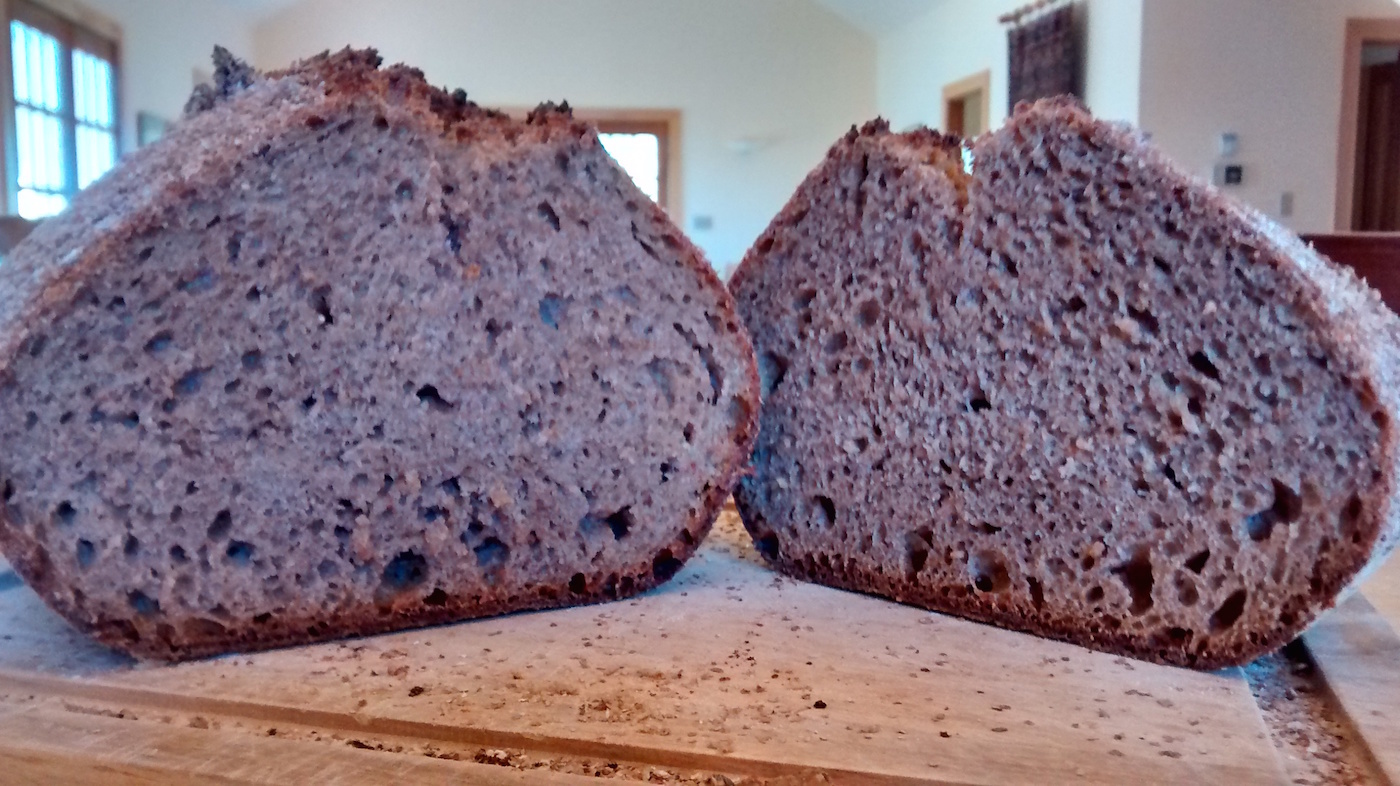
Here’s a loaf I just took out of the oven with flour as follows:
300g sifted turkey red
200g sifted spelt
50g sifted emmer
50g sifted einkorn
30g wheat germ
To that I added about 425g of water (~70% hydration which is on the dry end of my experiments) along with the starter and salt as specified in the original recipe.
I also rolled the dough in the sifted out bran prior to putting it into the proofing basket. Baked at 500 degrees in a romertopf with cover on for 25 minutes then cover off for 20 minutes.

1 Like
Got great results using this recipe with some modifications.
- Used the technique from the Sour Dough Slept video.
- Used three twenty minute stretch and folds after combining the ingredients.
- No changes to the ingredients other than I needed to add more water to get it sticky enough.
I need to go about 16 hours on the rise due to the temperature in the house, wasn’t really ready to 10 hours or at 12 hours.
First time using parchment paper to transfer the dough to the clay baker… I like it ! …going with that from now on ,also makes it easy to remove it from the baker.
Results: A nice chewy, tasty, tangy loaf!
Love this site!


2 Likes
Hi Eric,
I am new to your website and to baking SD bread. I tried this recipe using my 2 month old starter and the bread turned out great. It was only a tinge more sour than I would have like.
However, I need help with oven-rise etc. My bread did not rise much and instead of being round and tall, it was flat. How can I improve on oven-rise???
I left my dough out in my cold dining room for 18 hours and it was very bubbly and rose twice the height.
I also left the final proof to 2 hours. When I inverted my dough into the basket, I could feel that the dough was full of air, as it was soft and wobbly.
When I took it out of the oven after it was baked and cooled, the bread had quite a lot of holes in it. Bit I would like more holes and bigger ones.
How can I create more BIG holes?
I love your instructions, as they are clear and your videos are most helpful.
Thanks for sharing your wonderful recipes. This recipe will definitely be used again and again. But I need to iron out the above problems before I bake the next one.
Thanks,
Susan
Hi Susan,
I think all you need to do is shorten the proofing times a good bit. You’ll have to experiment with how much but your dough is doing almost all of its rising before the bake and kind of loosing its oomph by the time you go to bake it. It sounds like it’s rising plenty, but just too early. By shortening both the long and short proofing times, you’ll get more oven spring (a better rise) when you put it in the oven. I would get this part down first and then come back and let us know if that helped and we can look at the bigger holes thing too.
I love this recipe. Does anyone have a sense of whether doubling the ingredients would work to make a larger loaf? We eat this so fast. I am using a large Dutch oven. Lengthen the baking time? I don’t have the space or the extra Dutch oven to make two loaves at a time. Thanks.
1 Like
I’ve had good results increasing quantities by 15 - 20 percent for a bigger loaf without changing baking time. Never tried doubling. What about baking one loaf after another?
My sense is that you can scale it up by 2x. And, yes, lengthen the baking time. I would also lower the baking temp 25-50º so it bakes more uniformly throughout. This is where using an instant read thermometer comes in particularly handy to monitor the baking until you get a workable routine down.
pali
Please help. My bread is beautiful and dark on the outside but uncooked on the inside. Also, the crust is very hard and tough. My yeast is beautilul and bubbly so I don’t think there is any problem with the yeast. Anyone have any suggestions? There is not a lot of rise either.
i just made my second loaf today. The first one was fantastic, and this one looks lovely,too(too hot to eat yet). However, both times the bread was done after 30 minutes-in fact the all-white-flour loaf today was probably done at @27 minutes. There was absolutely no need to bake it for another 15 minutes as the recipe indicates. I am using a Romertropf clay casserole dish. Has anyone else had this experience?
I wonder if your oven is running hot. Have you checked the setting against an oven thermometer? Not that you need to necessarily, if you’re getting good results, no need to worry.
1 Like
Hello,
I love this bread. There is one problem that I am having while proofing the dough before placing it in the cloche. Even after heavily flouring the proofing basket , the dough sticks to it really bad and does not slide off easily into the cloche. I also tried using the parchment paper.towel to line the proofing basket , but the dough still sticks to the parchment paper too. I even tried oiling the parchment paper.
What do you think is going on with my dough. I follow directions very carefully. I also use a digital scale for ingredients and it is not too hot or cold in my kitchen. I would greatly appreciate some help here. Thanks
Have you done what Eric suggests regarding spraying oil on the basket and then using rice flour (or I use semolina)? Since doing this I haven’t had a problem. Don’t proof in the basket too long either, or that will encourage it to stick. That’s where I was going wrong before I found Breadtopia.
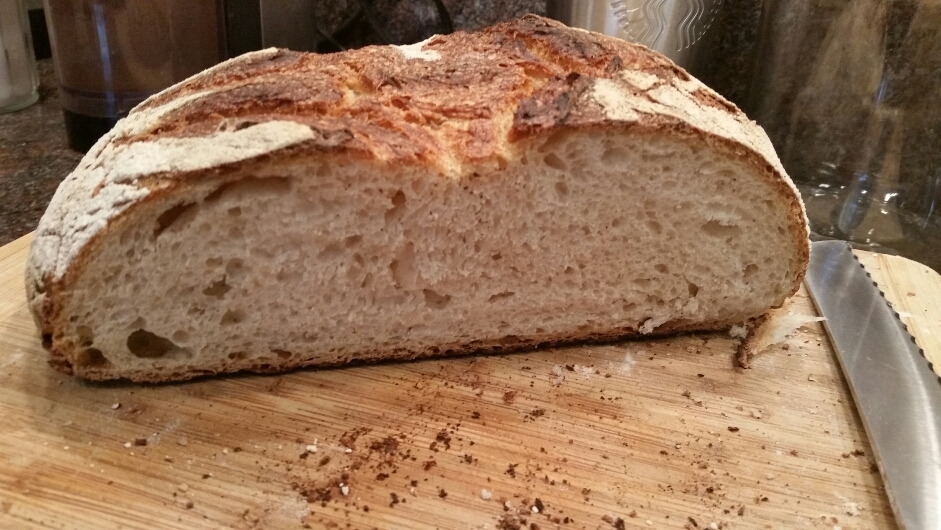
I used to have flat loaves of sourdough bread. They tasted good, but I did hope for more of a rise. So based on your comments, I made the starter a little stiffer but still active and I shortened the first long rise to about 10 hours. I don’t have a proofing basket so draped a well floured towel into a small colander and after folding it and giving it a 15-minute rest, I put the ball of dough into the towel and could tell it was less goopy than usual. Anyway, after a shorter 2nd rise, I baked as instructed and have done it just twice but am thrilled that two times I got a great round loaf. I’m amazed and happy and well fed!
1 Like